Now that we have learned the basics of the HSL in Part 1 and the general method of working with the HSL in Part 2, it is time to expand our horizons a bit. So far we have focused on using HSL to improve an image by attempting to get realistic colors that have been customized to fit particular need.
Aside from assisting in taming colors and bending them to our will, the HSL offers us a vast array of creative options. Here are a few unique methods to process your images with and how to do them.
Cross Processed Look
It is quite common to see cross processed film faked merely through the application of a carefully tuned Split Tone. However, if you really process print film in slide chemicals or vice versa, you will not only get a color cast, but usually a fairly severe color shift.
Obviously you cannot fake an accurate color shift with just Split Toning, to really get the feel, you need to make some HSL adjustments. Sometimes a light adjustment of Hue and Saturation is all you need to create a cross processed effect with a good Split Tone. However some cross processed effects are quite severe, and will require a radical modification of color.
Consider this image, which is pretty much a straight up snapshot. No processing, rather boring, a perfect candidate for a harsh cross processing effect.
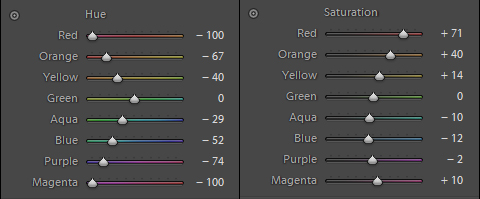
Now I am going to throw a completely crazy set of Hue and Saturation settings, with the goal of shifting most tones towards Magenta, whilst leaving Greens relatively alone. Here is the HSL window after my adjustments.
Notice in my collection of adjustments, that the Hue features and angular “curve” than maxes out Red and Magenta all the way to the left, shifting Red to Magenta and Magenta to Purple. Green’s Hue is the only color unchanged, as I am using that as an anchor color, the one that does not shift.
Saturation on the other hand, features a smooth, lazy curve. This time Red is pushed to a high Saturation with Orange and Yellow saturated to a lesser extent. Again, Green is left alone, while the Blue/Purples are all under-saturated. Magenta also gets a positive kick.
Here is the result of that HSL configuration.
A good color shift created in the HSL will greatly contribute to the believability of your digital x-pros.
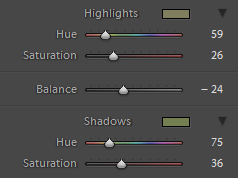
Notice the relatively severe overall color shift while the Greens remain untouched. Frequently in the cross processing act, only a small spectrum of color will be accurate whilst the rest suffers a severe shift. Now this image as is does not quite feel completely like a cross processed image. It needs a Split Tone applied. Here are the settings used.
These settings create a fairly light green cast, designed to make the natural greens in the processed image pop a bit more. Once it is applied to the image we get this result.
While not as severe an effect as what a lot of cross processing presets accomplish, it is very close to results I have gotten from shooting slide film and processing in print chemicals. You can apply a stronger Split Toning to get a more severe effect if that is what you desire, but a good color shift created in the HSL will greatly contribute to the believability of your digital x-pros.
Color Monochromes
Lightroom has an absolutely fabulous system for creating stunning Black and White images. We previously covered the Grayscale Mixer in our Monochrome Mojo series. But have you ever thought of making a monochrome image while staying in Lightroom’s color mode?
It is simple, and opens up additional monochrome opportunities. Here is what we are going to work with this time.
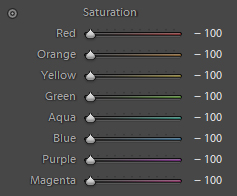
The first step in a color monochrome is to slam all of the Saturation sliders in the HSL to (-100).
Now the image is a basic desaturated monochrome conversion. While not as impressive as monochromes made in the Grayscale Mixer, this creates the starting point.
Now, the next step is carried out in the Basic Tone panel, adjusting the Presence sliders. Adjust Clarity, Vibrance and Saturation until the conversion feels full bodied and less flat. Just adjust until the image gets some pop. Here are the settings used in this demonstration.
These settings render the image like so.
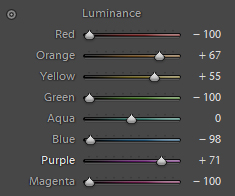
Now, is the time to perfect this monochrome conversion. Dropping back down to the HSL it is time to start modifying the Luminance sliders much like the sliders of the Grayscale Mixer. The Luminance sliders should be freely adjusted until the conversion looks as desired.
The HSL is so nuanced that it takes a long time and a lot of practice to carry out your desires.
Here are the final Luminance settings for the current image.
The final monochrome conversion vastly improved as compared to the original desaturated image.
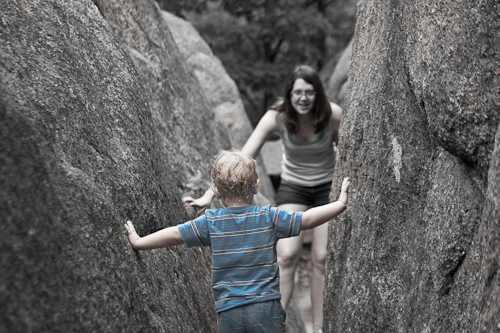
Conversion in this manner also allows for creating selective color images. Simply use the Local Adjustment Brush with a Saturation of (100) to bring color back into the image. You will have to tweak all the prior adjustments in the conversion to get a desirable look, but this method of monochrome conversion offers that option to you.
These two alternative HSL processes are not the only unorthodox uses of the HSL, but they are two of the more useful and straight forward. With the basics learned in this series you now have the knowledge and feel for color required to get the most out of the HSL. From here the sky is the limit.
I would like to restate that the HSL is one of the most straight forward tools, but at the same time the HSL is so nuanced that it takes a long time and a lot of practice to be able to jump right in and carry out your desires. Use of the HSL is really a case of practice makes perfect – the more you use it the better you will get with it.
