In Part 1 of Setting Your Settings – Tuning Lightroom, we covered the General and Presets tabs of the Lightroom Preferences dialog. Today we are going to look at the External Editing and File Handling tabs. Some of you have been asking how to get more performance out of Lightroom. Today we will see how to optimize output for Photoshop and how to speed up the Develop Module. So let’s jump right in.
File Settings For Lightroom For Photoshop
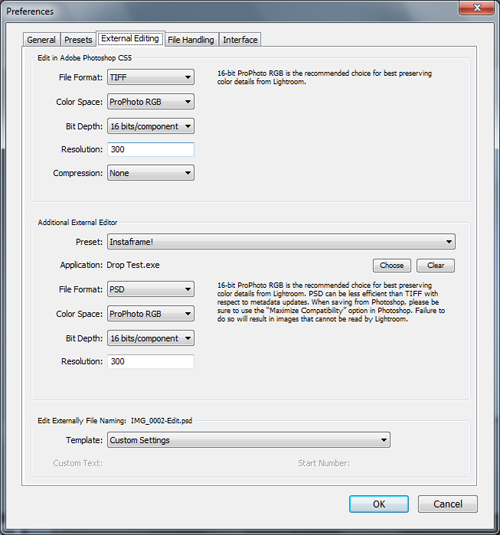
Edit in Adobe Photoshop CS X (where X represents your highest installed version of Photoshop) allows you to configure the file settings that will be applied when Lightroom renders an image for editing in Photoshop. There are many reasons why one may desire to specially configure exports for Photoshop. In my mind, the most important reason is to retain as much detail and color information possible in the process.
File Format: This setting allows you to choose between the two different image formats Lightroom can provide you image to Photoshop in, PSD or TIFF. At heart, it truly matters little what you choose, but there are some considerations to make. First, if you choose PSD, you must be sure to save your image in Photoshop with the Maximum Compatibility option in Photoshop.
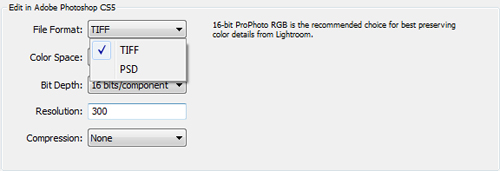
If you forget to enable Maximum Compatibility, Lightroom will not be able to read the resultant file. Unfortunately, saving a PSD with Maximum Compatibility renders any slight benefit of using PSD moot. Plus, PSD is in no way a “standard” format like TIFF and other applications may have difficulty with its output.
I used to religiously utilize PSD when editing in Photoshop, but I have switched my workflow to TIFF. TIFF support my desired bit depth and color space while retaining great compatibility with other software. I recommend TIFF, but it is a personal issue. For more information, read this older discussion on TIFF vs PSD, primarily paying attention to Jeff Schewe’s response.
Image Settings For Lightroom For Photoshop
Color Space: This option allows you to choose between the three color spaces Lightroom allows you to export to; ProPhoto RGB, Adobe RGB (1998) and sRGB. Each has their place in photo editing, but my concern is for maintaining color fidelity from Lightroom to Photoshop.
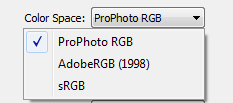
You really only have one choice when it comes to retaining data; ProPhoto RGB. First, ProPhoto RGB has the widest gamut of the three choices, meaning it encompasses more possible colors.
Second, Lightroom’s internal color space, often referred to as MelissaRGB, is based upon ProPhoto RGB. This simply means that ProPhoto RGB will retain most color information present in Lightroom recreating your image in Photoshop faithfully.
Choose ProPhotoRGB.
Bit Depth: Again, a simple choice; Lightroom offers to export your image with a bit depth of either 8 bits per channel or 16 bits per channel. Bringing it to simple terms, each color channel can have 256 levels of intensity (8-bit) or 16.7 million levels (16-bit).

You can read more on the specific of bit depth in Taking a byte out of bit depth – Jpeg vs. RAW, which is a fairly in depth discussion of bit depth as it pertains to JPEG vs RAW. However, the concepts apply directly to this situation as well.
Yeah, you will have to downsample to 8-bit to save as a Jpeg for the web or most print labs, but you always want to edit in a 16-bit environment to maintain image quality. Export in 16-bit, bottom line.
Resolution: This option allows you to set the output resolution of your image. But note, this resolution is merely a tag for Photoshop, it does not scale your image in the least. Your image exports at its native resolution without any scaling. I use 300, and that is simply because I have it in my head images should be at 300 DPI for printing.
That covers the Edit in Photoshop options, which are also applicable in the next section.
Addition External Editor allows you to add other imaging programs right to Lightroom’s Edit In… options.
Preset: This option allows you to access your prior external editor settings and to save any new ones.
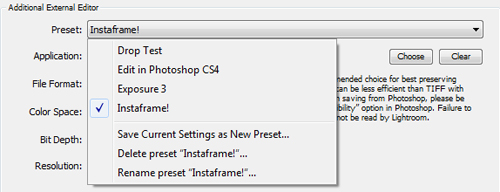
After you configure all the other settings in this section, you can come back here to save those settings as a preset. This adds the option to your Lightroom dialogs.
Application: This option allows you to select what application you wish to utilize as an external editor. Click on the Choose button to open a dialog that allows you to browse to the application you wish to use. Clicking on Clear resets the option to its default state of no external editor.
File Format, Color Space, Bit Depth and Resolution operate the same as the Edit in Photoshop options.
After setting up an External Editor, remember to save your current settings as a new preset by selecting Save Current Settings as New Preset from the Preset dropdown box. This will add this external editor to Lightroom’s Edit In… options, allowing you to configure many different external editors.
File Handling Settings For Lightroom For Photoshop
Finally, we come to Edit External File Naming. This allows you to choose or configure your naming schema for files generated in the External Edit process. If you have a need for custom naming, this is where you configure it, but for most users, this option is of little concern.
That completes the External Editing tab and brings us to the File Handling tab.
The File Handling tab has four sections; Import DNG Creation, Reading Metadata, File Name Generation and Camera Raw Cache Settings.
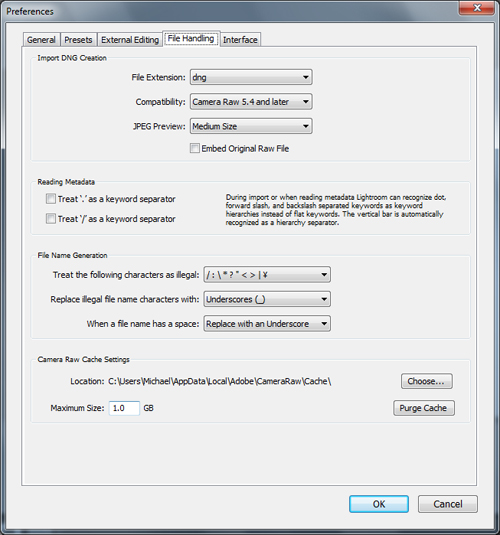
Import DNG Creation allows you to configure the settings that Lightroom will utilize when creating DNG files when you choose to import and convert to DNG.
File Extension: This option allows you to choose which extension to use for DNG files; dng or DNG. This choice is obviously vital, but I am at a loss as to why.
Compatibility: This option dictates to Lightroom the level of backward compatibility you wish to endow your DNG files with.
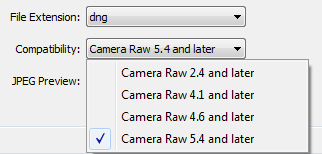
Multiple versions of Camera Raw are presented, all the way back to Camera Raw 2.4. Selecting Camera Raw 2.4 or Later will allow your DNG files to be read by a wide array of image editing programs, but will lose features added in later versions of Camera Raw. I recommend setting the compatibility to the newest version of Camera Raw that your configuration allows. If in a workplace with multiple versions of Photoshop, you may want to choose an older version for compatibility. If it is on your own setup, with Photoshop CS 5 and Lightroom 3, set Compatibility to the newest version of Camera Raw available.
JPEG Preview: This option allows you to set the size of the embedded JPEG used for thumbnail previews. It can be set to None, Medium Size or Full Size. The only thing saved here is disk space by choosing smaller settings, so in general, set it to at least Medium Size if not Full Size.
Finally, you are presented with a check box for Embed Original Raw File. Select this if you want your original RAW file to be embedded in the DNG for later extraction. Keep in mind though, this will double the file size and offers little over a DNG on its own or keeping the original RAW file as well as the DNG.
These options together will configure every DNG that is created during Import. The big option for improved use is to set the Compatibility setting to the newest version of ACR possible.
Next is the Reading Metadata section, which allows you to set two special characters as separators when Lightroom reads metadata. If you are importing a lot of tagged images you may want to configure these settings to make sure the separators you used will be acknowledged.

Treat ‘.’ as a keyword separator: Checking this box will force Lightroom to recognize a period (.) as a keyword separator.
Treat ‘/’ as a keyword separator: Checking this box will force Lightroom to recognize a forward slash (/) as a keyword separator.
Easy, right?
File Name Generation settings are used by Lightroom to guide automatic naming of file while importing into your Lightroom library.
Treat the following characters as illegal: This option presents two collections of character in the drop box that Lightroom will treat as illegal characters and will not use when naming newly created copies on import. Your selection will be dependent on your OS and your need to share across different OS’s.

I recommend that you choose the larger list to use as illegal if you are in a mixed OS environment.
Replace illegal filename characters with: this drop box presents a few options to you to use as replacements for illegal characters.

You can choose Dashes, Underscores, or for Lightroom to replace illegal characters with other charters that look similar. The choice is a matter of aesthetics and personal practice.
When a file has a space: This option allows you to choose to keep spaces in filenames, replace spaces with an underscore or replace spaces with a dash.
With that we have looked at all the File Handling options in the File Handling tab. There is one option left, however, that does not deal with File Handling. This option, however, is more important for Lightroom performance than with the naming and creation of files.
Camera Raw Cache Settings: Alright, so on import you always render previews 1:1 right? And the Library Module works great, it flies. However, when you move to the Develop Module, every time you change an image it seems like you have to wait for it to render.
The reason for that is, while all the other modules seem to use the previews generated at Import, the Develop Module relies on a special collection of files called the Camera Raw Cache. This Cache is shared between Lightroom and Adobe Camera RAW, and every time you edit an image, its latest iteration is saved in this cache.
This is why once you render a file in the Develop Module you can go back to it quickly, that is until you fill the cache. Once the cache fills, the oldest files are removed. So to be sure that files are ready to edit on demand, you want a large cache.

Location: This allows you to view the location of the Camera Raw cache. The Choose… button allows you to choose where you want the cache to reside. It is a good idea to consider placing the camera raw cache on a second internal hard disk if one is available. This will ensure speedy access to the cache, leaving the primary drive for the Operating System and your Library.
If you are forced to have the Operating System, Catalog and Cache on the same drive, it will slow Lightroom considerably. If you have two drives, have the OS and Catalog on the primary and the cache on the secondary so that the same drive isn’t trying to access the catalog and cache simultaneously. Lastly, if your hardware allows you to store each on its own drive, you’ll achieve optimal disk performance for Lightroom.
Maximum Size: This option allows you to set the maximum size of the Camera Raw cache. The bigger the cache, the more images can be at the ready for the Develop Module. Current versions of Lightroom allow a cache of 200 GB, which allows for a lot of images to be cached simultaneously, speeding Develop Module speed.
Set the cache to the largest size you can. If the cache is on a second drive, as recommended, go ahead and max it out. This will be one of the biggest improvements you can make to Lightroom. If you have only one drive, be cautious of your cache size. A large cache can quickly fill up your disk, and if space runs dry, your OS will slow, Lightroom will slow and your work pace will slow.
So, in a multiple disk setup, go all out. However, in a single disk environment, make the cache as big as you can. Try to keep at least 20% of you disk free so your system does not start to bog.
You can also click the Purge Cache button to clear the entire contents of the cache. This is handy if you run out of disk space. However, you will once again have to slowly build up the cache.
That finishes up part two. Now on to part three where we’ll wrap up our exploration of the Lightroom Preferences.


