Do you ever have the feeling Lightroom just isn’t working fast enough for you, or that its behavior is not exactly what you desire it to be? It can be frustrating when Lightroom slows to a crawl as you are editing tons of photos and the good news is that you can improve some things.
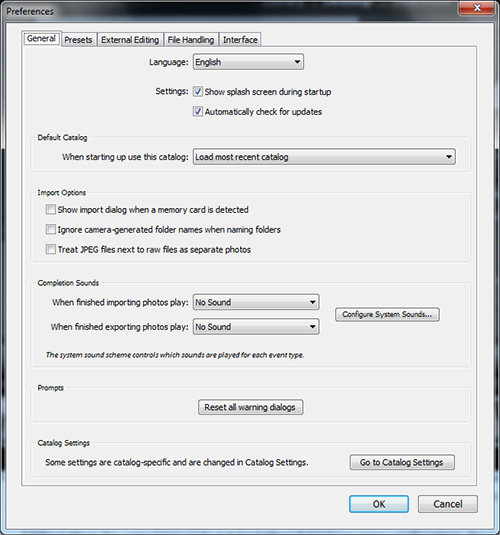
We are going to focus on Lightroom Preferences today. Lightroom’s Preferences dialog can be found in the Edit menu (Windows) or Lightroom menus (Mac) of the menu bar. Simply look towards the bottom of the drop down and choose Preferences… Alternately, you can also use the keyboard shortcut Ctrl/Cmd + , to launch the Preferences dialog. Once the dialog is launched it will appear as such.

First, you will be presented with the General tab. This tab allows you to control some of the basic functions of Lightroom. Let’s break down this dialog and cover each individually.
Language: This is self explanatory, and if it’s not set right you may have some problems. Just set it to the language you wish Lightoom to use.
Settings: This consists of two checkbox options; Show splash screen during startup and Automatically check for updates. If an action is checked, Lightroom will do this at startup each time you run Lightroom. You can uncheck Show splash screen during startup if you desire, on some systems this may save a bit of time, but Lightroom will still have to load either way. Be sure to enable Automatically check for updates, there is no reason not to as it will keep you aware of any new updates.
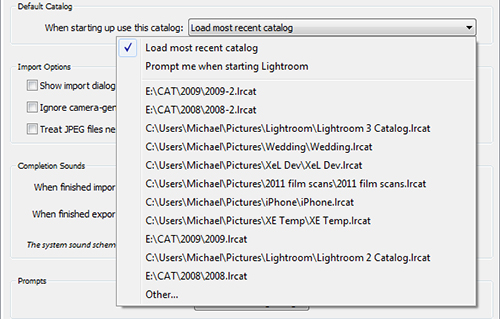
Default Catalog: This option allow you to determine what catalog is opened at startup. The drop down offers the choices of Load most recent catalog, opening up the last catalog you were working with and Prompt me when starting Lightroom, which will force Lightroom to ask which catalog you wish to work with at startup. You may also define a default catalog, from the list of catalogs at the bottom of the menu.

Import Options: These are three on or off settings used to assist in customizing import sessions to a users liking.
- Show import dialog when a memory card is detected – Enabling this feature will cause Lightroom to fire up the Import dialog whenever a memory card is inserted in the system. Can save a few moments, but can be frustrating when you are not intending to actually import images.
- Ignore camera generated folder names when naming folders – Enabling this option will cause Lightroom to ignore any naming conventions used by your camera and rename the files and folders.
- Treat JPEG files next to raw files as separate photos – This can be useless or handy depending on your needs. By default, Lightroom ignores JPEG files by RAW files, avoiding multiple copies in the filmstrip from shooting RAW+JPEG. If you shoot RAW+JPEG, you probably want default behavior, but if you switch between RAW and JPEG for some strange reason, you may want to enable this option to prevent photos from not appearing in Lightroom.
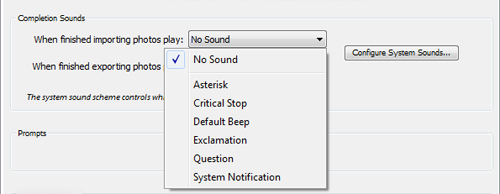
Completion Sounds: These options allow you to set a notification sound to play whenever a process is completed. You can set system alarms to sound for the following events – When finished importing photos… and When finished exporting photos…. Each option gives you a drop down box offering you system sound notifications that you can have play when either of these processes complete. These options can be handy for slower systems, when Lightroom is almost nonfunctional until an import or export session is complete, alarming you that Lightroom is ready for you. But if you got a speedy system or only export a few photos at a time, it might get annoying.

Prompts: Remember all those little warning windows that used to pop up when doing stuff? Those ones you glanced at and checked “don’t warn me again”. Well, the Reset all warning dialogs button will bring all those back to ignore once again.
Catalog Settings: This option brings up the Catalog Settings dialog to set catalog specific settings. This is important stuff, which we will look at later in this series.
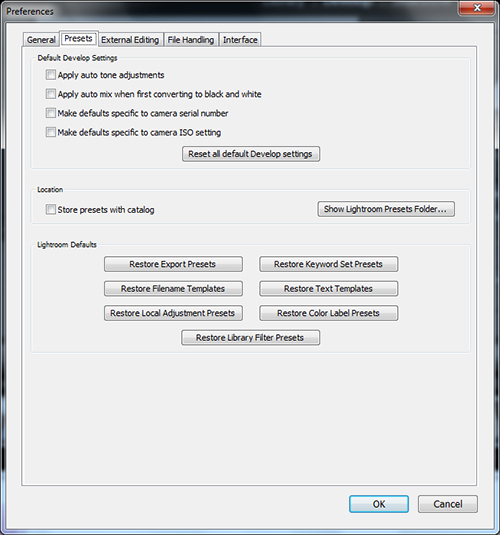
That completes the General tab, so let us move over to the Presets tab. This tab allows you to set your default develop settings, locations of presets and allows you to restore the presets that shipped with Lightroom.

Default Develop Settings: This selection of options allows you to define how Lightroom will automatically handle any given file.
- Apply auto tone adjustments – This option, when enabled, will allow Lightroom to automatically adjust images in the Develop Module. Essentially, this is the same as clicking Auto in the Tone section of the Basic panel of the Develop Module. When disabled, images appear in the Develop Module as shot.
- Apply auto mix when first converting to black and white – When enabled, this setting will force an automatic adjustment of the Black and White Mixer when you first choose to convert an image to black and white. Lightroom makes its best guess and applies it.
- Make defaults specific to a camera serial number – This option, when enabled, allows you to set a default processing for all images taken from one particular camera. When you create a new default development process in the Develop Module, it will note the serial number of the camera used for the image you set the new defaults from. All images taken with this camera will now be processed identically, automatically. This is a good option id you continually make the same adjustments to all images with any given camera.
- Make defaults specific to camera ISO setting – Much like the last option, this will tie a certain default processing style to whatever ISO the image used that the new defaults were created with. When this option is enabled, and you make a new default setting using an ISO 400 image, all other ISO 400 images will receive the same processing automatically. When you combine this setting with the camera serial number setting, you can set custom defaults for all your cameras and their respective ISO settings.
Location: This option allows you to choose to have presets tied to individual catalogs, and allows you to quickly navigate in the operating system to your presets folder. By enabling Store presets with catalog, you will allow each catalog to have its own unique set of presets as opposed to the single, global preset collection that is default. This can be handy if you focus your catalogs on certain styles of shooting, such as portraits or landscapes, you can customize the presets just for the catalog’s content. However, if you use many catalogs, this option is better left alone, as you can fragment your preset collection and not have a desired preset immediately at your disposal.
The Show Lightroom Presets Folder… button simply brings up the Macintosh Finder or Windows Explorer window, navigated directly to where the presets are kept. This is handy to quickly get to the actual preset folders, or if you don’t remember the folder path.
Lightroom Defaults: This section provides 7 buttons to quickly restore many of the presets that were provided with Lightoom upon installation. If you have happened to alter any of the stock presets, these buttons will allow you to restore them to the settings they contained when Adobe shipped them. When you restore these presets, your custom and downloaded presets are not altered, so you can restore away without risking your efforts in creating and installing your custom presets.
With that, we have covered the General and Preset tabs of the Preferences dialog. Now, on to part two where we’ll take a look at the External Editing and File Handling tabs and later we will look at the Interface tab and peek in to Catalog Settings.


