It sits in the upper right hand corner of the Library and Develop Modules of Lightroom. Outside of a quick glance now and again, how often do you even consider the Histogram in Lightroom? For that matter, outside of helping detect highlight and shadow clipping, what is the Histogram even good for? Simply put, the Histogram is an excellent tool to quickly gauge proper Exposure and Tone in an image, but what good is it in post processing in Lightroom?
Many of you are aware of the Histogram, what information it conveys and how you can manipulate it using the Basic tool palette in Lightroom. Exposure, Recovery, Fill Light and the Blacks sliders all directly impact the appearance of the Histogram.
Worry about your histogram when you shoot and you will have to worry less about perfecting it in post.
These Basic tone tools are easily controlled in the Histogram itself. You should be aware of the ability to directly manipulate the Basic tone settings directly from the Histogram itself by dragging your mouse while clicking inside of any given zone of the Histogram window.
As you run your mouse over the Histogram itself, you will notice the basic tone tool that affects different areas of the Histogram.
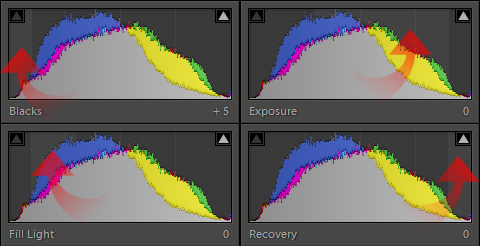
As you can see from the above image, the far left of the histogram is affected by the Blacks slider. Moving to the right, Fill Light is the next slider to demonstrate control over the Histogram. The next and most impactful slider is Exposure followed by Recovery. To most, these four tools hold primary dominion over the appearance of the Histogram, and in general that is a correct assessment.
However, have you ever considered the relation the Histogram shares with the Tone Curve settings? While not intrinsically intertwined as the Basic tone sliders, the Tone Curve holds its own sway over the Histogram. There are no handy zones in the Histogram to adjust Tone Curve settings, however as you adjust Tone Curve, you will alter the Histogram and the effect will be fairly consistent.
Before moving on, take a moment to reflect on what the Histogram is there for. The Histogram is merely a graphic representation of distribution of tonal range of your image. In Lightroom, the Histogram shows a composite of the Red, Green and Blue channels. The Histogram becomes even more useful nearing the left and right sides of the window, as when tonal range in the image reaches these boundaries, highlight and shadow clipping occur leading to data loss in the image.
The histogram is merely a reference to allow you to look at you images color and tonal qualities in an abstract way. The importance of the Histogram in Lightroom is deprecated in comparison to the importance of the histogram on your camera LCD, but it provides a lot of information about you image and can help you see issues with your image that may otherwise be difficult to see in the image itself.
To understand the relationship between Tone Curve and the Histogram you really need to play around with a few images to see the effect. But for sake of demonstration, consider this Histogram from an image. It is a baseline Histogram with no Basic tone adjustments aside from a -.29 Exposure adjustment.
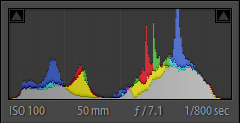
To start looking at the correlation between the Tone Curve and Histogram, start by simply looking at the Tone Curve palette.
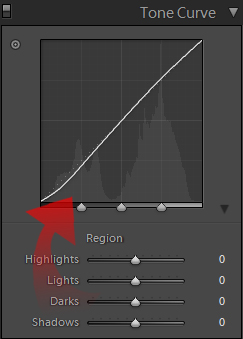
What you should be noticing here is the “shadow” histogram that is visible behind the line representing the Tone Curve. Due to distortion introduced by the rectangular presentation of the Histogram window versus the square presentation of the Tone Curve window, the “shadow” histogram appears to be stretched taller. Aside from that the basic shape of the two histograms are the same.
Now adjust the Shadows Region slider in the Tone Curve settings. When you hover on the Shadows slider Lightroom will show you the area of change available to you.
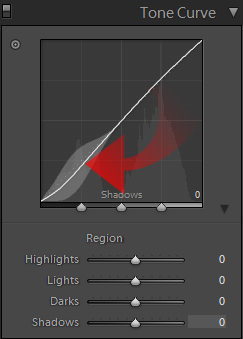
Now as you adjust the slider to its extremes, you will start to notice the effect that the Shadows Tone Curve adjustment has on the Histogram. The following image presets the effect of the Shadows slider on the Histogram.
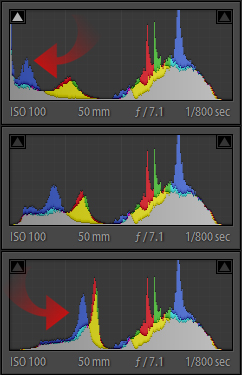
The top image shows Shadows set to -100, middle is set to 0 and bottom is set to +100. As you can see, Shadows affects the left-most third of the Histogram. Applying a -100 setting pulls the left most quarter of the image to the far left, causing black clipping as indicated by the lit triangle in the upper left corner of the Histogram. Applying a +100 setting pushes the left-most quarter up against the left third of the Histogram, exaggerating the tone of the image as indicated by the enlarged spikes.
As compared to the middle, control Histogram, the Shadows creates a lot of change in the Histogram, however it has no effect on the middle to right side of the Histogram. Now look back at the affected area depicted on the “shadow” histogram from the Tone Curve window. As you can see, the preview covered the entire area adjusted on the Histogram over the “shadow” histogram. The range previewed in the Tone Curve window is all that is effected. Note that the “shadow” histogram does not change shape, only the real Histogram is effected.
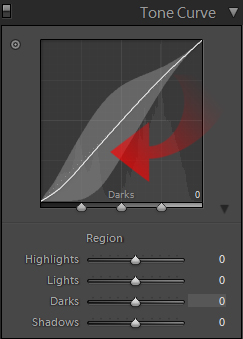
Moving onto the Darks adjustments, take note of the affected range in the Tone Curve window.
Now consider its effect at extremes.
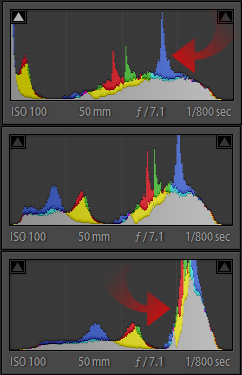
The Darks slider functions almost like the Shadows slider, however effects a much larger area of the histogram. You already knew this by how large the area of effect preview was in the Tone Curve window. At -100 the Darks adjustment clips the shadows the same as the Shadows slider. The left most quarter of the image was slammed up against the left boundary of the Histogram while the entire middle of the histogram was shifted heavily to the left. Looking at the +100 adjustment, the effect was just as dramatic in the other direction, clumping up the peaks of the histogram from the middle up into a bunch on the right most quarter of the Histogram.
Starting to see how the Tone Curve works its magic on the Histogram?
If you blow out your highlights at the time of capture, you will not be getting them back in Lightroom easily.
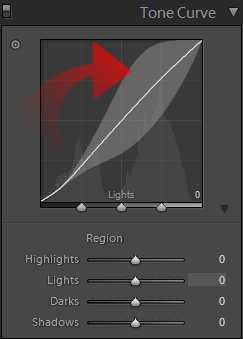
For the sake of completeness, let’s look at both the Lights and Highlights as well. There is no more need to explain, as you can see the effect. Just keep in mind that Lights is the opposite of Darks, and has a similar broad effect. Highlights is the inverse to Shadows and has a more limited effect.
Here is the Lights Tone Curve preview.
And the effect upon the Histogram at its extremes.
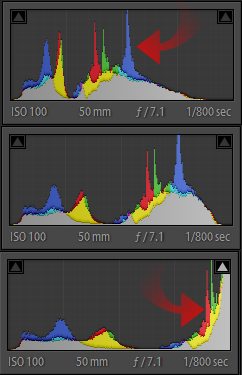
Finally, the Highlights Tone Curve preview.
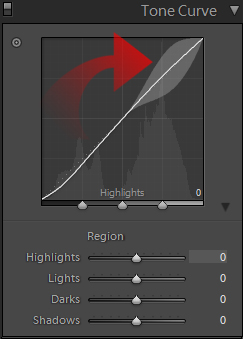
And its respective effect on the Histogram.
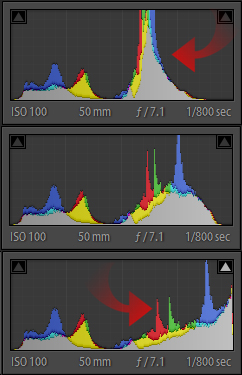
Now it is possible that the graphic presentation of effect was not required, but seeing the effects of the Tone Curve on the Histogram should make it a whole lot easier to understand how the two work together to help you understand and master your images. But keep in mind, this is not just a one way street.
Basic tone settings rank above the Tone Curve in Lightroom’s application priority. Therefore adjustments made directly to the Histogram, either by directly manipulating it or manually adjusting the Basic tone settings, will alter the Histogram before the Tone Curve is applied and will even be reflected upon the “shadow” histogram present in the Tone Curve. Obviously basic tone adjustments will effect how much of a tone curve is needed, and heavy basic tone adjustments will lighten the need for aggressive tone curves.
By watching your Histogram and leveraging both the basic tone adjustments and the Tone Curve, you can wrangle your images into perfection easier. Use the tools to make the image look good on screen and double check their representation on your Histogram. Between a good looking image and a well distributed Histogram, you will be creating technically better images.
A parting word of advice. Before you ever concern yourself with the Histogram in Lightroom, go for the best distributed histogram on your camera LCD you can. If you make sure you expose for a right weighted histogram on your camera you will be doing well to preserve your image quality. Then you can re-adjust your histogram as needed in Lightroom. When shooting make sure to leave your self some room at the edges of your on camera histogram if you want to preserve detail in your images. If you blow out your highlights at the time of capture, you will not be getting them back in Lightroom easily. If you can leave some room for shadow detail, you can increase the apparent depth of you image.
Worry about your histogram when you shoot and you will have to worry less about perfecting it in post.


