Scanning Is Not An Exact Science …
If you’re like me, you probably have a few shoe boxes full of old negatives from the days before digital. Whether your source material is a print, slide, or a negative, you only have one option to make it a digital file, scanning.
Today let’s take a brief journey into the world of scanning, with the goal of making the best possible scan for manipulation in Lightroom.
Scanning images from prints, negatives and slides has taken on the air of an arcane art. Scanning, in fact, is an art but it is only arcane if you let it be. There is a great deal of debate on proper scanner settings, scan resolutions, bit-depth and so forth.
Most people’s arguments for their method have merit, often erring on the side of disk space. You should, however, take a look at what software you plan to edit these images in. Scan in your images with that in mind. Today let’s take a brief journey into the world of scanning, with the goal of making the best possible scan for manipulation in Lightroom.
There Are Some Things To Do Before Scanning …
First, let’s consider a scanner. There are two basic types of photo scanners, flatbed and dedicated. Traditionally, if you were scanning slides or negatives you would want a dedicated film scanner, such as the Nikon Super Coolscan 9000 ED, which produces stellar scans at a resolution of 4000 DPI for the astronomical price tag of over $1000 dollars USD.
Throughout the years, dedicated film scanners have been far ahead in quality over flatbed scanners when it comes to scanning transparent media. In recent years, flatbed scanning technology has been closing the quality gap, especially with Epson’s offerings of the V500 and V750.
Epson’s V500 is of particular interest to casual film shooters and those wishing to archive their catalog of negatives. For an average price of around $200 USD, the V500 offers great scanning at an incredible value. Claiming a 6400 by 9600 resolution and 48-bit color depth, it makes some strong promises, and delivers in general.
Due to the Epson’s affordable nature and reasonable quality, I will be utilizing it as my example scanner throughout this series. If you have another scanner, everything will still be applicable to your process, just dig a bit to find out your scanners specific capabilities. If you are in the market for a quality scanner, I whole-heartedly recommend the Epson V500.
Scanning Software Solutions …
Your first challenge you will encounter is which scanning software you will use. The Epson comes with its own custom application Epson Scan. Nikon and Canon scanners come with their own software as well. While any of these packed-in applications will work well, you may want to consider using third party scanning software.
The two I will recommend you trying out are LaserSoft Imaging’s SilverFast and Hamrick’s VueScan. Both of these pieces of software offer expanded scanning capabilities. I personally recommend VueScan for a Lightroom workflow, as you can output your scans directly to DNG files, which is a big plus in a Lightroom or Adobe Camera Raw workflow. Each has demo versions for you to try out, so grab them and find the one that suits you best.
Moving on, I will try to be as software agnostic as possible. Optimum scan settings will be similar regardless of the application you choose to use. I will be showing screens from Epson’s Epson Scan for illustrative purposes. Spend some time with your software of choice to know where the different settings are located.
Now turn on your scanner, fire up your scanning software and get ready to scan. First on the agenda, clean you scanner’s platen glass. When scanning, dust is your enemy especially when scanning 35mm negatives! I clean my glass with pre-moistened lens wipes and follow up with a microfiber cloth. Do not spray cleaner directly onto the glass or use compressed air.
A Clean Machine Is A Happy Machine
The cleaner may get into the body of the scanner if it hits the edge of the platen and compressed air can cause hard bits of dirt to scratch your glass.
Setup your scanner for the type of scanning you will be doing. If you are scanning a photo, make sure that the document panel is installed in the lid of your scanner and is clean. If scanning film, make sure your film holder is clean and remove the document panel. Now clean your media.
If you are scanning a print, gently wipe off any dust with a dry microfiber cloth and place onto the scanner platen. If you are scanning negatives, wear some cotton gloves to handle your negatives. Give them a blast of compressed air on each side. If there is any visible dust left, hit it again with air or wipe it down with a dry microfiber cloth.
Always take time to clean before you start.
If there is still dust left on the negative or it has other gunk on it, you will need to use some emulsion cleaner on the negative. Look for some PEC-12 from Photographic Solutions, it works great on negatives and slides. Simply apply some to a microfiber cloth or lens paper and gently wipe the negative with solution. In a pinch you can use Ronsonal lighter fluid, it has worked for me in the past, but I worry about it damaging the negative in the long run, so I don’t recommend using it.
Once the negative or slide is clean, insert it into the proper film carrier, and place in the scanner. Close the lid.
Always take time to clean before you start a scanning session. Getting rid of dust before scanning improves your overall scan quality and limits the need to rely on dust removal software or hand spotting in Photoshop.
Let’s Do A Little Walkthrough
Now it is time to set up your software to scan. Here is where I am going to start breaking with conventional wisdom. Many scanning experts will tell you to scan at the resolution you need for print and to scan with 24-bit color; they will say the extra information is extraneous and unneeded.
I disagree, since we are integrating these scans into a RAW workflow, we want these scans to be as high quality as possible with as much color information as can be gleaned from the subject. So follow along as I set up Epson Scan for a scanning session. Other applications are similar, but more complicated.
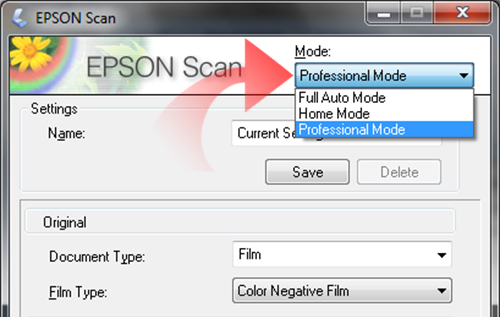
In Epson Scan, change the mode at the top to Professional Mode; do not leave your images to the whim of the software.
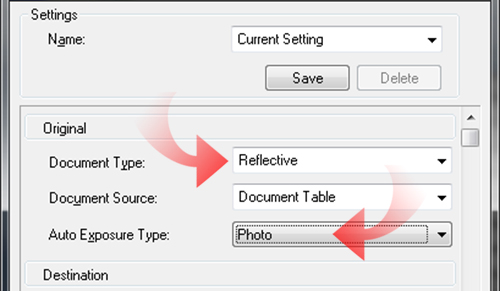
Now in the Original box set the Document Type option to the correct setting for your media; Reflective if you are scanning a print or Film if scanning a negative or slide. If you chose Reflectiveîmake sure Auto Exposure Type is set to Photo.
If you are scanning with the Film setting, choose the proper Film Type; Color Negative Film or Positive Film.
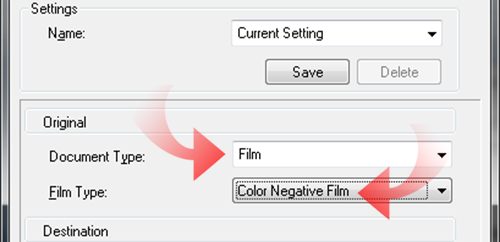
If you are scanning black and white film, leave the setting as Color Negative Film. Others may disagree with me on this, but you can control the black and white tones better in Lightroom scanning as color and converting to monochrome. Plus, the film base of B&W film often has a nice faint color to it, making you a toned image right out of the scanner (T-Max films often have a nice purple/red tone to them). Try it both ways if you are not convinced, but I think you will find color scans of B&W film more rich and fulfilling.
Now in the Destination box we are going to set out image bit depth. Always set the Image Type to 48-bit Color. Click the Plus icon next to Image Type and make sure that Scanning Quality is set to Best.
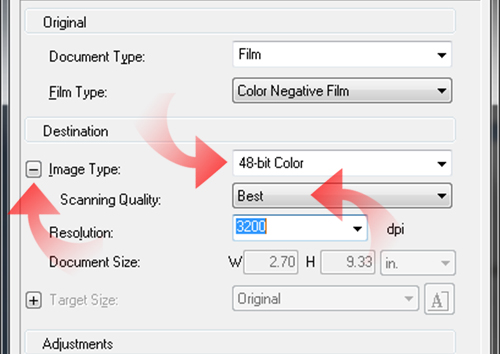
Again, you may read elsewhere that you only need 24-bit color. But if you have ever worked with a JPEG in Lightroom you know that is not a satisfying experience. A 48-bit TIFF is the only format you want to scan for editing in Lightroom or ACR.
Next you need to set the scan DPI (or PPI for sticklers). Using the V500 I recommend scanning prints at 600 DPI (1200 DPI if you are going to enlarge). If scanning 35mm (also known as 135) slides or negatives, the optimum scanning resolution appears to be 3200 (this may vary from 3000 to 3600 depending on software).
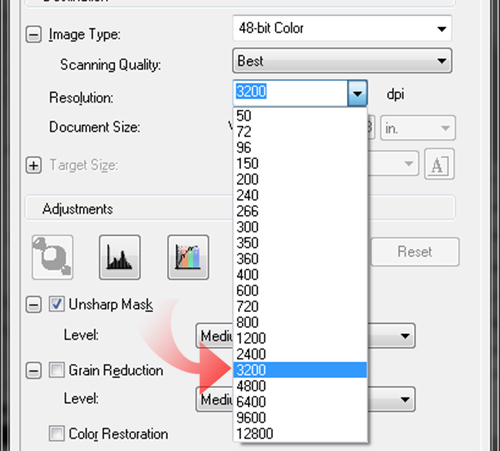
You can scan at a higher DPI if desired, but you will likely find that you are not capturing more detail, just making more pixels. Test a bit at different resolutions, find what you like. A 3200 DPI scan will create the equivalent of an 11-12 megapixel image when imported into Lightroom or ACR and will make good quality 8×10 Prints.
If you need to go larger, I refer you to OnOne’s Genuine Fractals once again. If you are scanning medium format film (120 and 220) I find 1200 or 2400 to be good, but I will often scan them at 3200 DPI as well.
For a moment let me explain why we don’t scan at the scanner’s full resolution. The big numbers printed on the web sites and side of the box represent interpolated resolution, not the scanner’s native resolution. This means that the scanner will scan at a lower resolution and up-sample to a higher resolution, much like Photoshop will do.
This has the disadvantage of not capturing more detail, but just creating more pixels. I have found on my V500 that 3200-3600 DPI is the sweet spot for scanning negatives, and much higher resolution creates interpolated images. I can use Photoshop and Genuine Fractals if I need to upscale and do it better than scanning software.
You need to test this for yourself with you scanner to see at what point you cease gaining more detail. The highest resolution that gets noticeable detail is your preferred setting.
For now ignore the buttons in the Adjustments section. They won’t do any good until you scan the preview and the adjustments are nothing you can’t do in Lightroom or Photoshop better and easier.
Uncheck the following option boxes;
- Unsharp Mask (Sharpen in LR)
- Grain Reduction (film has grain, deal with it),
- Backlight Correction
- Dust Removal
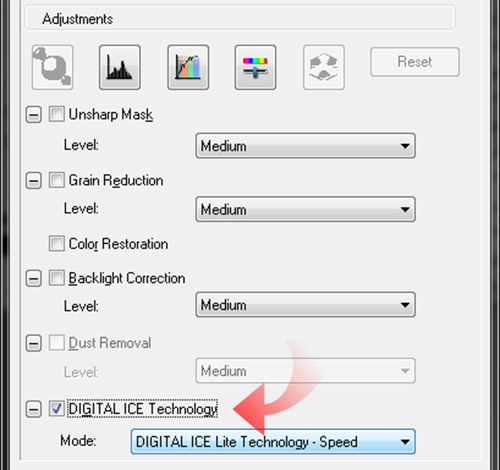
Check the DIGITAL ICE Technology box (also called Infrared Dust Removal in other software). I set this to the DIGITAL ICE LITE setting personally, as it will take care of small dust and scratches. The Quality setting often hits the flaws too hard creating strange artifacts. It’s easier to clone out bad spot or use the Healing Brush in PS or Spot Removal in LR than to correct a poorly fixed area that ICE botched. I’m not a huge fan of DIGITAL ICE, but it does work, I just don’t trust it to make an image perfect.
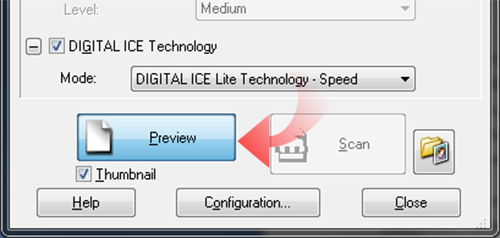
Now go ahead and click the Preview Button. This will pull up thumbnails of each frame or image on the scanner.
You can go ahead and rotate the preview thumbnails by clicking the rotate buttons in the preview window.
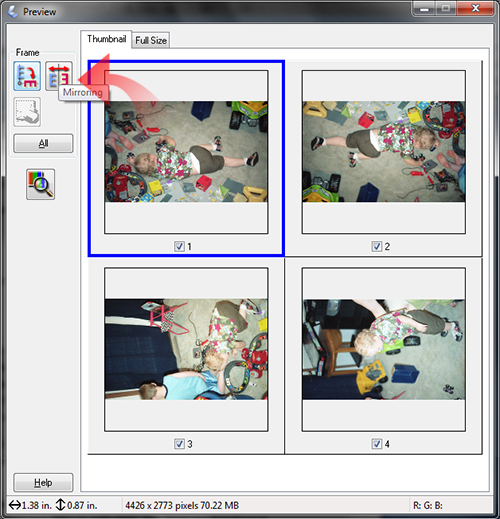
Other software will show all the frames in one big preview and allow you to crop each individually; Epson Scan makes it easier and pulls apart the film strip into individual images. If there is glaring issue with the images, you can try to correct them using the buttons in the Adjustments box, but 90% of the time it should look good at the scan, and if not Lightroom or Photoshop are infinitely more capable of correcting the image, especially since we are scanning in 48-bit color.
Check the boxes for the images you want scanned. Click Scan. This pops up the File Save Settings dialog box. Select you destination location and file names. Make sure you choose TIFF as your output format. This will keep you images uncompressed with full color data. Let it scan away.
You have now created a 48-bit Color TIFF output ready to be imported into Lightroom. If you are using Silverfast or VueScan to scan film you also have an option called Multi-Exposure which will scan the image twice at two different exposure settings, ensuring highlights are not blown out and shadows not blocked up.
This effectively increases the dynamic range of the scan allowing more adjustment latitude later on in Lightroom. Another advantage of VueScan is that if can output the 48-bit TIFF directly into a DNG file ready for Lightroom and ACR that will carry all your adjustments, snapshots and edit history with it.
Scanning Isn’t Rocket Science, Either
So, let us recap the basics.
- Clean your scanner and media.
- Scan in at a bit depth of 48-bit color.
- Prints at 600-1200 DPI.
- 35mm negatives and slides at 3000-4000 DPI.
- Medium format between 1200-4000 DPI.
- Black and White negatives as Color negatives.
Don’t worry about fixing color issues until you get the image into a proper photo editor, unless you really like using sub-par tools. Save files in a 48-bit TIFF format (or directly into DNG if option is available to you).
This should give you a good start to scanning quality scans. Again, this method makes massive files with lots of data. But that data other will call useless is of great importance when using the Adobe RAW engine in Lightroom and ACR to edit you scans. Every added bit of bit-depth and dynamic range give you that much more latitude when it comes to adjusting you images.
A 48-bit color TIFF from the V500 creates a TIFF that can use almost all Lightroom presets designed for RAW files. Can’t do that with JPEGs.
In Part 2 I’ll be discussing some tips for using these scans in Lightroom.


