Last time we briefly covered scanning photos in such a way that will produce great results when performing further editing in Lightroom. Today we are going to look at the process of working with these scanned files in Lightroom, laying out my personal workflow and some tips that I have discovered over the past few months of scanning a lot of negatives and processing them in Lightroom. So let’s begin with getting those files into Lightroom.
My first recommendation I have is to start a new Lightroom catalog solely for editing scanned photos. I make a new catalog for every roll of film I shoot. If scanning old, unsorted photos and negatives, I try to group them into folders of about 50 photos.
The reasoning for doing this is twofold; it segregates my scanned photos from my DSLR RAW files and it also keeps the Lightroom catalog small, increasing performance with these rather massive files.
Keeping the scans in separate catalogs also allows you to backup each set of scans with their own respective catalog, easing future editing if required.
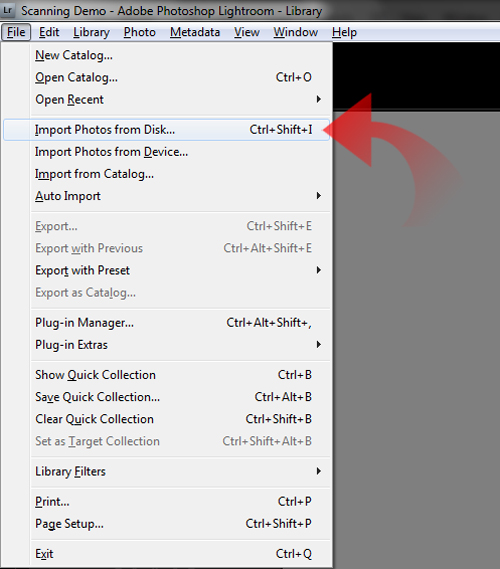
Now that you have your new catalog created, you need to bring the photos into the catalog. For this I import the files from their location on the disk. Simply click File and select Import Photos from Disk…
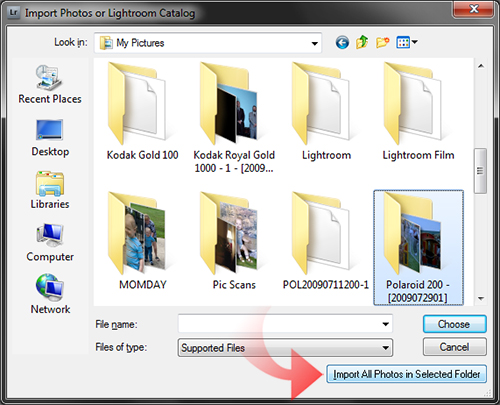
Once the dialog box opens, browse to the folder where your TIFF files are contained. Highlight the folder of images you wish to import and then click on the Import All Photos in Selected Folder button.
I keyword my files with the film brand and speed of the film
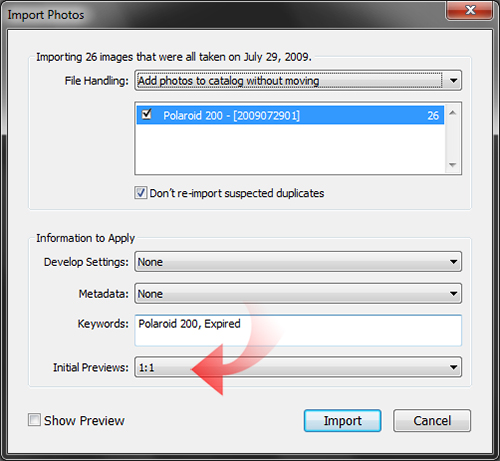
Now the Import Photos dialog opens, allowing you to configure your import. Here I choose to not apply any special processing. I leave the Develop Settings option to None and Metadata option to None.
I keyword my files with the film brand and speed of the film and any other keywords that will apply to every image in the folder. Finally, pay attention to the Initial Previews option. Set it to 1:1 causing Lightroom to render full preview from your TIFF files, this will greatly speed up processing in the long run.
Go ahead and click Import once everything is configured correctly.
I convert all the TIFF files in my catalog over to DNG files.
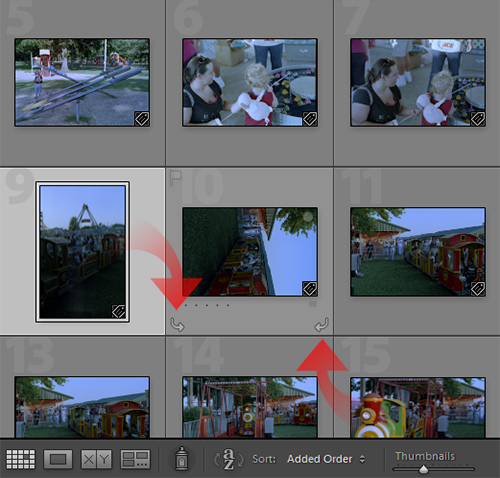
Next, you will want to rotate any images that need rotating. Although this can be done at any time, doing so on import will make your life a lot easier down the road. Simply look at all the scans in the Library Module and rotate as needed, using the rotate buttons depicted on the bottom of the thumbnail box.
My next step, although optional, is a real help to me. I convert all the TIFF files in my catalog over to DNG files. Keep in mind that this will not magically make your scanned TIFF files RAW files, but will endow your files with the metadata prowess that DNG can provide. This is by no means required, but if you choose to back up the scanned files without including your Lightroom Catalog, you can have all adjustments to the images written to the metadata inside the DNG wrapper.
To do this, select all the photos in the Library Module, or click on Edit and then choose Select All. Now select Library from the menu and choose Convert Photos to DNG.
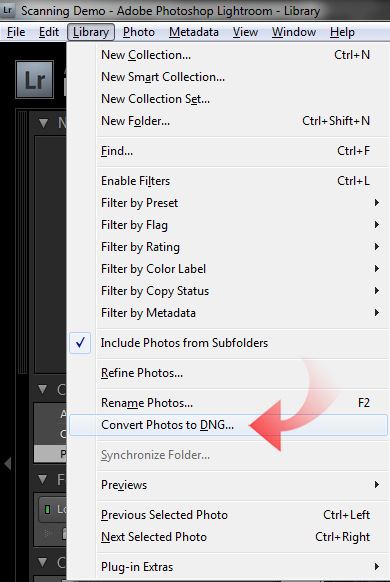
Once the dialog box pops up, we need to configure the conversion. In the Source Files section of the dialog, uncheck Only convert Raw files and check Delete originals after successful conversion. This will allow Lightroom to wrap up the TIFF files in a DNG wrapper and then delete the original scans automatically.
If you want, you can choose to keep your original scans, but to me the DNG file is my preferred format. In the DNG Creation section set the File Extension option to which ever extension you prefer. Set Compatibility to Camera RAW 5.4 and later unless you have a need to open these files in an earlier version of Lightroom or Adobe Camera RAW.
Then set the JPEG Preview option to Full Size. Finally, make sure Embed Original Raw File is left unchecked.
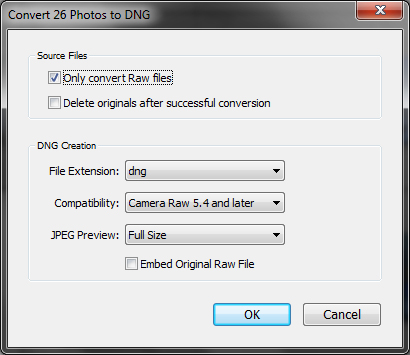
Once everything is set correctly, click OK. This process can take a while, but once it is complete it will never have to be done again. An added benefit of converting your TIFF files over is that they will be compressed with lossless compression, cutting the size of the file by 25% to 33% on average, making a big difference when it comes to long term backup and storage.
Also note, if you like DNG format and you are utilizing Hamrick’s VueScan you have an option to output your TIFF scan directly into a DNG wrapper at the time of scan saving you this step.
Once everything is converted, if you chose to do so, we are ready to get down to actually processing the images. This is where you should be thankful that you scanned your images in as 48-bit Color scans as opposed to 24-bit. In Photoshop parlance, a 48-bit scan is a 16-bit file, having 16 bits of data per color channel. A 24-bit file has a mere 8 bits of data per color channel.
A 48-bit scan gives you almost as much adjustment latitude as you would get from a digital RAW file.
If you scan a file in as a 24-bit scan, the resultant image will have as much color data as a simple JPEG would. If you have ever manipulated JPEG files in Lightroom, you know that is not a fun endeavor, leaving you with limited adjustment latitude. A 48-bit scan gives you almost as much adjustment latitude as you would get from a digital RAW file.
Your actual adjustment performance will depend on a variety of factors however. First is the dynamic range of your scanner, which can be enhanced by using multi-sampling and multi-pass scanning offered in VueScan and SilverFast. The more dynamic range present in an image, the wider adjustment latitude you will be afforded in Lightroom.
The next consideration is the media scanned. A photo print scanned in will have less range than a film scan. As far as film scans go, if you do not scan with multi-sampling you will get good adjustment range, however if you do scan with multi-sampling software that range will be extended even more. A final consideration is the quality of you slide or negative.
When I scan a high-quality, high-resolution film such as Fuji Velvia of Kodak Ektar I can push the adjustments of those scans much further than I can with low-end consumer film. A good Velvia scan can be handled almost exactly like a RAW file if the original slide was well exposed.
In other words, the better quality your scanner, software and media the better your scans will perform in Lightroom. A better exposed frame will always garner better results than a poorly exposed frame, although it is within Lightroom abilities to help you make a bad exposure better.
Now that I got that off my chest, we are ready to look at actually processing the files. The very first action I take when working with scans in Lightroom is to zoom to a 1:1 preview and look for excessive color noise in the grain of the scan.
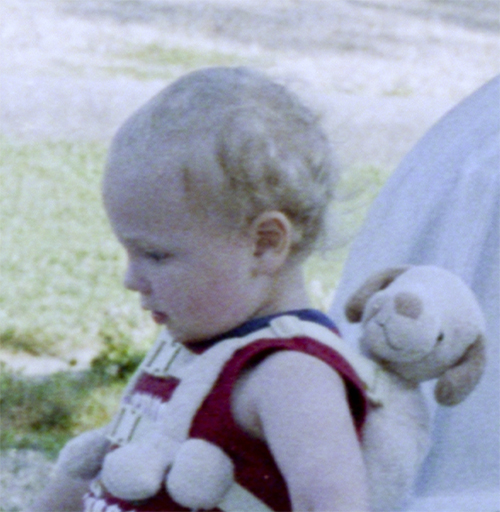
As you can see in the skin tones, this expired Polaroid High-Definition 200 film that I scanned has a lot of color variance. This can be put in check with the Noise Reduction tools in the Details tab of the Develop Module. I usually crank up the Color Noise Reduction to about 75 – 100. This would normally be extreme when processing a digital RAW file, but it will remove excessive color variance from the scanned image.
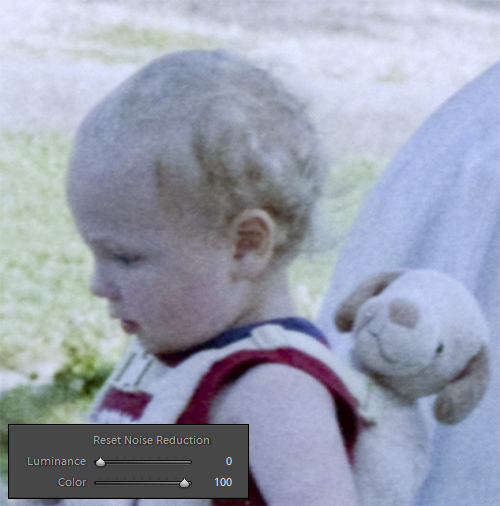
The next issue you may encounter is excessive grain. Although I am a huge fan of grain, many are not, and you can alleviate some of the grain by using the Luminance Noise Reduction. However we will wait to reduce the grain until after we sharpen the image.
Now you need to give you image some sharpness before we go further into processing. We scanned the images with sharpening turned off in the scan software so that the scan would be as unprocessed as possible before we got it into Lightroom. This is primarily because I don’t trust automatic sharpening and feel it is much better done by hand in Lightroom.
Sharpening a scan is almost identical to sharpening a RAW file. If you are not familiar with Lightroom’s sharpening tools please check out my earlier article about sharpening in Lightroom. Sharpen your image as you would normally, but pay attention to your Masking option of the Sharpening tools.
As you sharpen you will notice the grain in the image starting to get out of control, the Masking tool will focus this sharpening only where you need it, you will find yourself using a Masking of around 80 – 100 on most images.
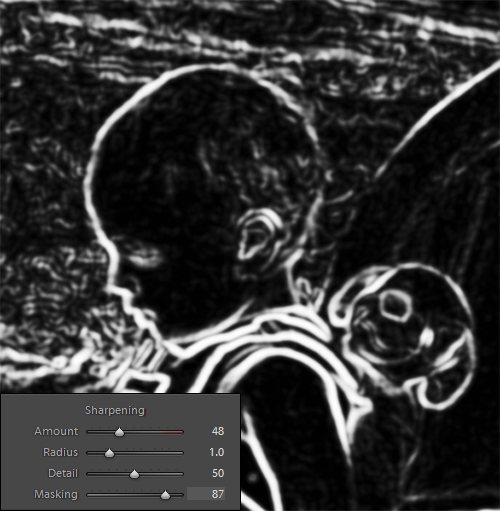
Keep in mind you will rarely get a film scan as sharp as you would a RAW image from a DSLR, so don’t push it too hard, but make sure you have well defined edges in your image.
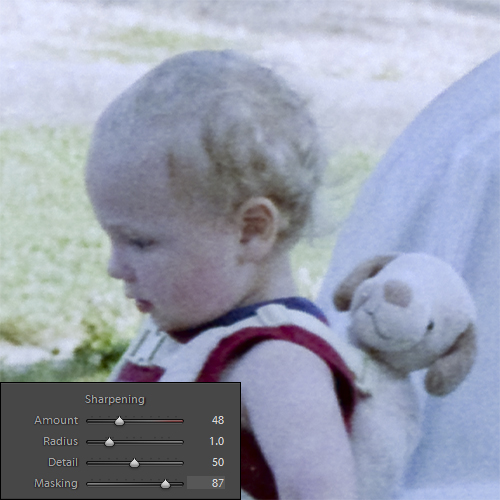
Now that you image is reasonably sharpened, you can use the Luminance Noise Reduction tool to kill excessive grain. Usually you won’t see much results until you get past 40 on the slider, but take care not to overdo it and soften you image too much. The following zoomed image shows all the steps taken so far.
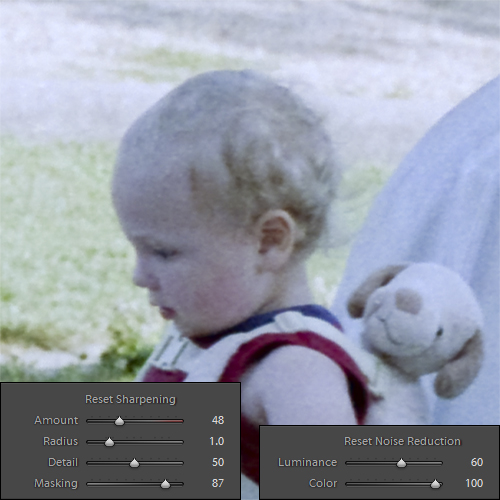
The previous steps were the most important when it comes to processing scans in Lightroom. From here editing is generally the same as processing a RAW image, with few differences that are caused by the nature of film. The biggest issue with film is color casts.
When you get prints made from film, color casts are corrected either by software or by the technician. Most film will have some amount of casting, but this is easily rectified by the Lightroom White Balance tools.
In this image, there is a significant blue color cast to the image.
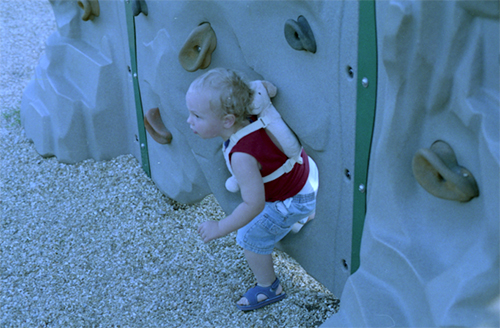
My first step is usually to grab the White Balance Selector and search around the image to find a good white point. As you scan the image with the eyedropper tool, keep an eye on the preview in the upper left side of your screen.
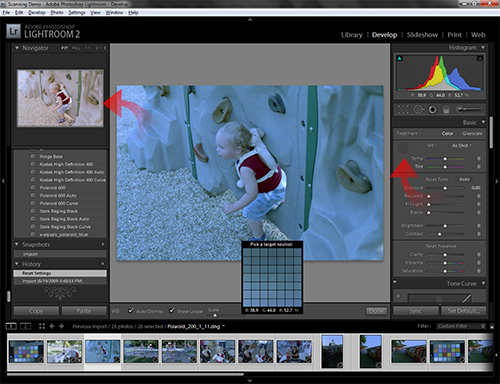
Once you get the image close to where you believe it should be, click. You now have a corrected white balance, removing the color cast. Now fine tune the white balance by directly manipulating the Temp and Tint. You will compensate for Reds and Greens with the Tint tool and compensate for Blues and Yellows with the Temp tool.
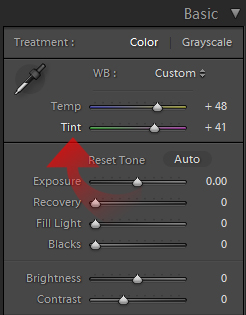
Once you have made your fine adjustments to the white balance, you have your color cast completely compensated for.
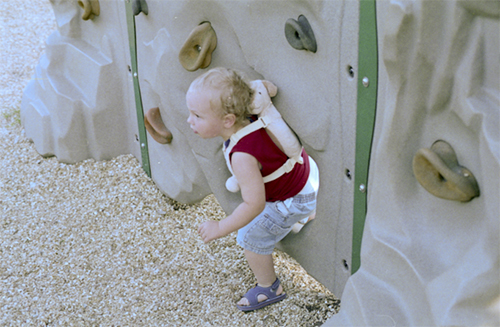
Now that the color cast is corrected, you can make sure that the exposure is set optimally. Go ahead and adjust the Exposure slider until you get the image looking the way you desire. Turn on your Shadow and Highlight Clipping warnings and try to eliminate as much clipping as possible.
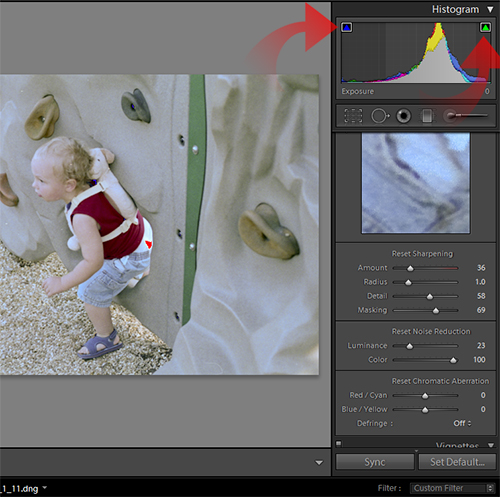
Watch in your image window for blue denoting shadow clipping and red denoting highlight clipping. You can remove shadow clipping by increasing exposure and remove highlight clipping by reducing exposure. This presents a problem, as many scans with have both shadow and highlight clipping.
Use just enough Recovery to eliminate the highlight clipping and then use enough Fill Light to minimize the shadow clipping. Once you have you Exposure where you like it and clipping removed you are ready to push on a bit further.
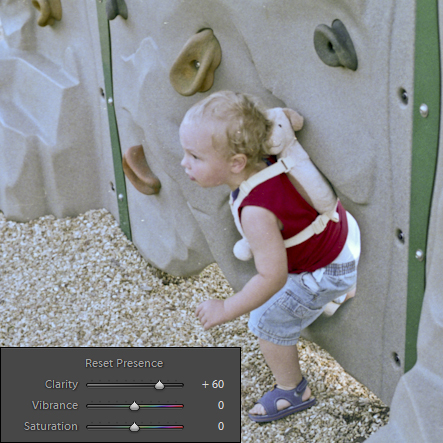
As you look at the image on your screen, you will notice that it is rather flat. The way we scanned in the image, we did not adjust curves or contrast. That we need to rectify now. The first slider I pay attention to is the Clarity slider. I adjust the Clarity until I get the image to develop some depth, but not too much.
Next, adjust the Tone Curve. You can manually adjust the points, but I will often start out with using the Medium Contrast Point Curve.
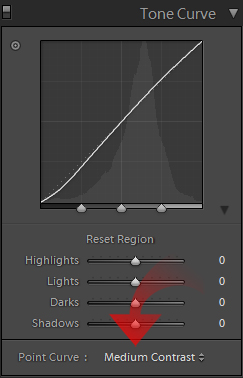
After a little fine-tuning of the curve itself, this is the result.
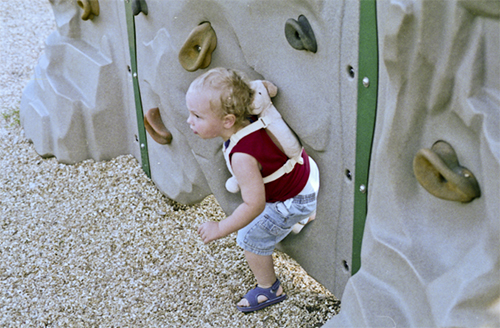
You can also use the Contrast slider as needed, but you will often find that Clarity and the Tone Curve will create a more pleasing contrast to you image.
With that you have finished up the primary processing of your image. Now you need to look at your image at a 1:1 ratio and look for any noticeable dust. This can easily be cleaned up with Lightroom’s Spot Removal tool.
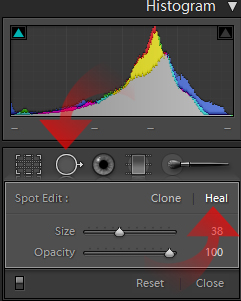
Make sure to select the Heal option of the tool. Now identify a speck of dust on the image. Click the cursor over the dust and then drag the mouse toward similarly colored area, watch the spot, once it disappears and the background looks smooth, release the mouse button.
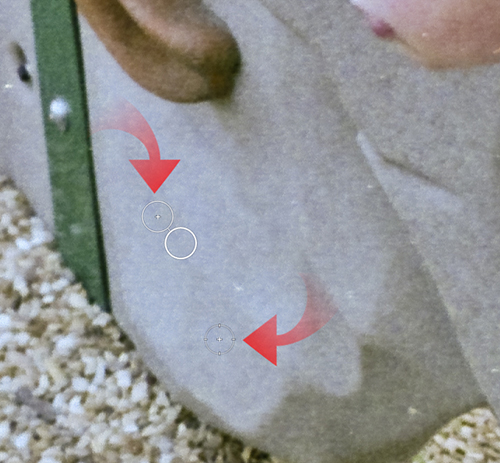
If there is excessive dust or major scratches in the image, you may have to hop into Photoshop to fix the image up, but for most images, Lightroom will be more than suitable.
And with that we have finished up processing a scanned image in Lightroom.
We didn’t use any presets in the process, but if you scan as discussed in the prior article, you can apply most presets designed for RAW files at the beginning of the process. Presets designed for RAW files will perform differently on scans, but should still get you the desired look with minimal effort.
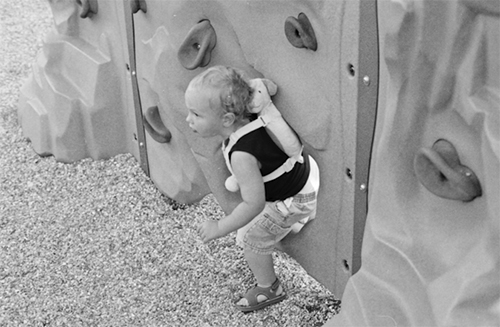
The above sample is the image I have been working on in the latter parts of this article with my Ilford HP5+ preset from LifeInDigitalFilm. As you can see, the preset made a smooth conversion, but really enhanced the grain of the film.
Hopefully this series has helped you to understand the basics of scanning for Lightroom. The scanning technique works just as well for Photoshop and Adobe Camera Raw. Although scanning at a lower bit depth can result in a good quality scan, it will not allow you to manipulate the image as easily in Lightroom as it does with a higher bit depth. If you need to save space, you can always convert your scans to DNG.
As always, any questions or comments are appreciated.


