Adobe DNG rules! At least that’s what we think.
We are big fans of Adobe’s Digital Negative (DNG) camera raw archival file format. Unlike proprietary formats (Nikon NEF, Canon CR2/CRW, etc.), we prefer a format that is openly documented, and supported by Adobe.
While I have engaged in many a debate on the issue of DNG versus proprietary RAW I still come back to using DNG. We settled on DNG years ago, and we continue to consult with our clients regarding leveraging this format for their production workflows as well as their long term digital archiving. Not only is this a great format for archiving, its perfectly suited for your workflow withinin Adobe Bridge, Photoshop, and Lightroom.
If you choose to stick with your vendors RAW format, that’s cool! If you’re hearing about the DNG format for the first time, or want to know more about how to convert your images over to the Adobe DNG format, read on!
There are a couple of ways to process and and setup your RAW images for conversion to DNG, and we’ll discuss how to convert and prepare your DNG files for use in your workflow.
Adobe offers two main ways to prepare and convert files to DNG:
- The free Adobe DNG Standalone Converter
- Within Adobe Lightroom via the ‘Import Photos’ dialog
Free Adobe DNG Standalone Converter
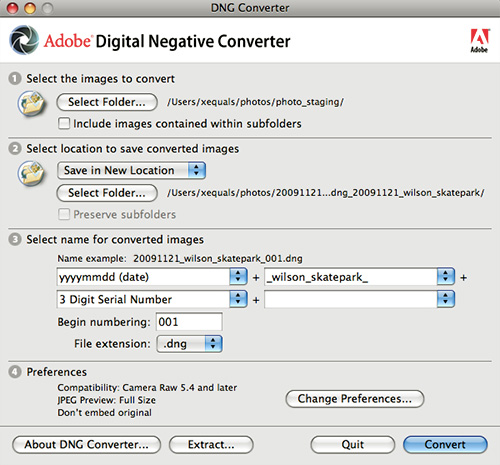
We’ll start with the standalone converter. We use this a lot in our studio because it is a rock solid workhorse batch processing engine. There is no reason to load all images into Lightroom just to convert to DNG. When you first open the converter you simply setup a few parameters:
 g
g
The converter has an easy 4 step process.
- select the folder or card where the images reside as native RAW format. Or, convert another file format such as TIFF to DNG if you prefer.
- select the destination location for your DNG files. This can be a shared drive, network file server, anything that is visible in the Finder (OSX) or File Manager (Windows).
- the file naming controls are very powerful and easy to use so that you can rename cryptic filenames like dsc_2398.NEF to something more informative such as 20091121_wilson_skatepark_001.dng. For more details on how we name our files, head on over here.
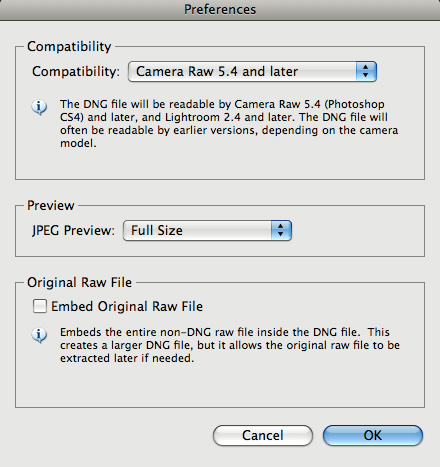
- the final setting of the output preferences will have an effect on the final size of the DNG file. We prefer the following settings:

Note the last selection Embed Original Raw File. We do not normally set this option but for those photographers that must maintain their original proprietary RAW file this allows them to do just that. The same converter we are using in these examples can be used to extract the original RAW files from the DNG as needed.
Once you are finished select OK and then Convert. The DNG Converter will process all selected images and alert you when finished.
Adobe Lightroom
Adobe Lightroom leverages the same DNG conversion engine although the user dialogs are a bit different.
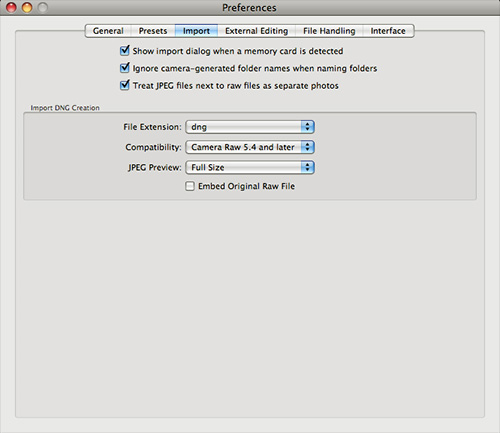
Accessing the DNG conversion preferences prior to import is not as apparent as in the standalone converter:

- within Lightroom select Edit >> Preferences {pc} or Lightroom >> Preferences {mac}
- select the Import tab to access the preferences for DNG conversion.
- we prefer to set the preferences as shown above
Importing your images for conversion to DNG within Lightroom is exceptionally easy:

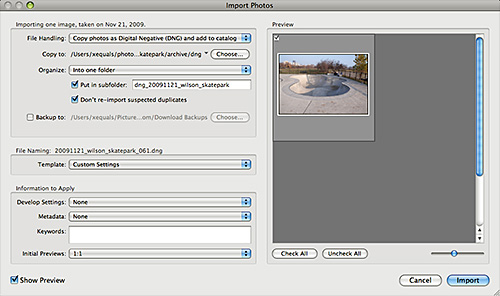
- within Lightroom select the Import Photos From Disk command or drag-and-drop your selected RAW files onto the Lightroom Library window.
- elect to Copy photos as Digital Negative (DNG) and import
- select the copy to destination location for your DNG files. This can be a shared drive, network file server, anything that is visible in the Finder (mac) or File Manager (Windows).
- the file naming controls are very powerful and easy to use so that you can rename cryptic filenames like dsc_2398.NEF to something more informative such as 20091121_wilson_skatepark_001.dng. For more details on how we name our files using the Lightroom import dialogh, head on over here.
- unlike the standalone converter, Lightroom allows you to tag additional metadata and keywords during the import process. This is a serious one-stop-shop dialog and an important one for properly setting up your file naming conventions and keyword strategy.
- lastly, we prefer to set Initial Previews to 1:1
We couldn’t be more happier with this solution as we process and archive images for our clients and our own studio work.


