Alright, so everyone has read the Sharpening In Lightroom Part 1 of our series and is now an expert with sharpening in the Develop Module, right?
I hope so, because we are about to explore another sharpening feature offered in Lightroom. Export Sharpening works in tandem with Develop Module Sharpening to prepare an image for its final medium.
Why Sharpen Twice?
Say that you are going to print an image on 8 X 10 glossy photo paper and you want it to look its best. Export sharpening will tune that image for that particular medium, optimizing the sharpening for output onto glossy paper. The tools does not offer you a lot of control, however; when utilized with Develop Sharpening it allows you fine control over the final appearance of your image.
Before we cover how you apply Export sharpening, let’s take a few moments to discuss its options. When you enable Export Sharpening, it lets you tailor your image to three different output mediums; Screen, Glossy Paper and Matte Paper. After you choose one of the options, then you get to choose the amount of sharpening; Low, Standard and High.
It would appear that the tool only offers you nine possible variables, given the three mediums and three strengths to choose from. However, Export Sharpening also takes into account your image resolution and final target DPI to account for the final size of the image and sharpen according for the size as well as the output media – still not a vast amount of control, but enough for what it does.
A Word Of Caution About Export Sharpening
Export Sharpening is not designed to do all the sharpening in your images, you would not open a RAW file and export it with Export sharpening for Screen viewing, as it will still come out soft. You need to pre-sharpen with the Develop Module tools to get your image looking sharp at 100% zoom. Export Sharpening will enhance your pre-sharpening to give it the proper amount of sharpening to ensure a quality output. If you give Export Sharpening garbage, you will get back garbage.
Now that we have an understanding of what Export Sharpening does, let’s go about using it. Fire up Lightroom and open an image that you want to sharpen. Now before we move on, give it some pre-sharpening in the Develop Module (refer to part 1 of this series if you are not familiar with these tools).
Time To Sharpen … Again
Once you have the image sharpening to where it looks good at a 100% zoom, right-click (control+click on Mac) to bring up the Contextual Menu. From that menu highlight Export, and when the sub-menu opens, select Export:
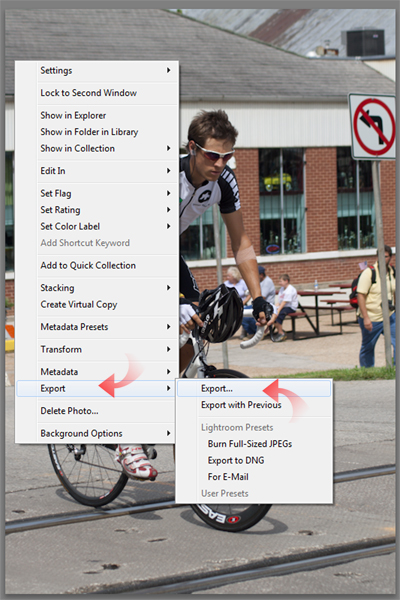
This will bring up the Export Dialog.
Once in the Export Dialog, go ahead and set up your Export Location and File Naming Information. Make sure to set the File Settings to JPEG and Quality to 100% – setup the Color Space however you would normally:
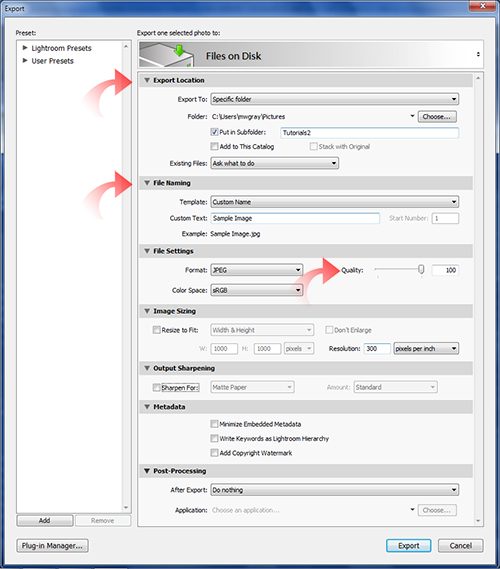
Now for the purposes of this tutorial, let’s assume we are going to print the photo on matte paper.
This matte paper can be either from your inkjet of photo lab, the sharpening will be good for either. Since we are printing the photo for display, go ahead and set the Resolution in the Image Sizing tab to 300 pixels per inch or whatever you would set for high-quality output for your printing method:
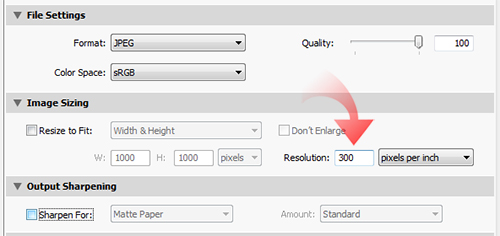
Do not bother resizing the image, just export at the native resolution this time.
Now we come to the Output Sharpening tab:
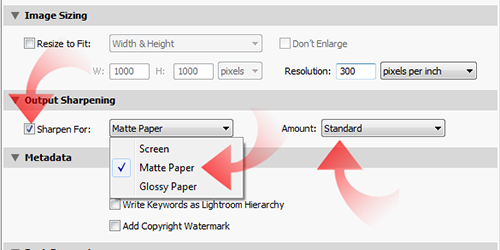
Click the checkbox by Sharpen For: and then choose Matte Paper from the dropbox. Next, click the Amount dropbox, and choose Standard. Since we pre-sharpened the image to look good at 100%, Standard should give us good results.
With everything set, go ahead and click on the Export button:
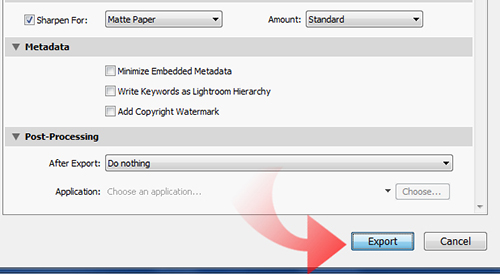
Lightroom will process the image and output it in the folder you defined in the Export Location tab. Go ahead and open it and zoom to 100%:
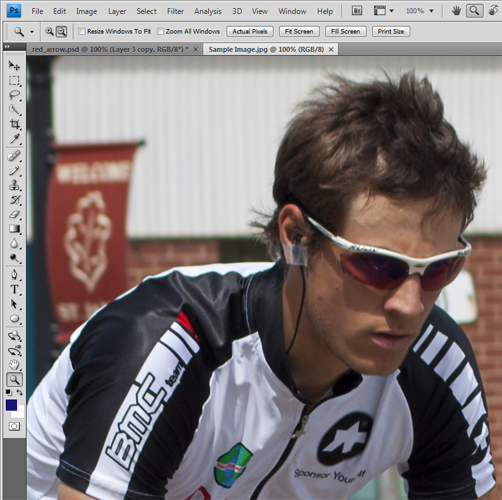
The image should look a bit over-sharpened on your screen – this is normal.
Hurts So Good
Go ahead and print it out or send it off to the lab at its native size. Once you see this final print on matte paper it should be nice and sharp to your eyes. Export sharpening is especially useful for matte papers, as they tend to look softer than their glossy counterparts.
Keep in mind, that when you export sharpen for a print medium, that the images will look over-sharpened when viewed at 100% in Photoshop. You will need to experiment some with the Amount setting, as your level of pre-sharpening will affect the level of export sharpening applied. If you pre-sharpened a bit soft, then apply a High amount of sharpening.
If you tend to get your pre-sharpening razor-sharp, then you will want to Apply Low sharpening. It will take some experimenting to get the feel for it down, but once you do, your image quality should greatly improve.
I’d Prove It, But …
In writing this article, I actually ran a test printing out the same image on both glossy and matte paper at varying strengths. My intention was to show the difference in sharpening between the final outputs, however I discovered there is no good way to show the final results. Scanning the prints brought in more noise, and had to be re-sharpened after the scan.
Breaking out my DSLR wasn’t an option, as again I would have to apply more sharpening. You will have to test the Export Sharpening yourself as there is no accurate way to demonstrate my results. To test, simply choose one image and pre-sharpen it.
Then apply both paper media Export Sharpening at each different Amount of sharpening. Export each to a unique filename denoting sharpening used and print each file to target media, if using a photolab have them print the filename on the back of each print so you know which print has what effect applied. This is the best way to see Export Shrpening at work.
I can tell you that the Export Sharpening did improve the sharpness of both glossy and matte prints when compared to the same image sharpened only with the Develop Module tools. The improvement is evolutionary, not revolutionary however. Export Sharpening is like waxing a freshly washed car; it enhances the image, but cannot fix the image.
A Few More Notes
Wax a dirty car and see what you get. In that though, go ahead and apply Export Sharpening to an unsharpened RAW image. You will get a slightly sharpened RAW image out, which is not sharp enough for a quality print.
Also, since Export Sharpening only offers three different output media, when using other media, you have to choose the best fit. Getting prints on Luster paper from the local superstore? I say sharpen for matte paper at low or standard. Sharpening for an image to go on a DVD video? Sharpen for screen and be sure to resize the image to the constraints of the video resolution.
Printing on metallic paper, sharpen for glossy, maybe even at a strong amount. Again, experimenting with the Export Sharpening is the only way to learn, as it does not share with us what is actually going on behind the scenes.
Although Export Sharpening is hard to demonstrate via web-images, it is definitely a tool you should give a go. With good pre-sharpening and appropriate export sharpening, you should be able to sharpen most any image without the need to jump into Photoshop. As always, the less you are in Photoshop, the quicker you are processing your images.
Learning to use the sharpen tools in Lightroom and practicing utilizing them will pay off by requiring less screen time and giving you more time behind the viewfinder.
