Last time we took a fairly in depth look at Color Spaces. We are not going to go quite so deep today, but I am going to take a few minutes of you time to skim over ICC Profiles. ICC Profiles are similar in function to Color Spaces, in that they define a finite range of colors you have to work with. However, unlike Color Spaces, ICC Profiles define the range of real colors and output device, such a printer or minilab unit, can produce.
ICC Profiles can be used two ways. The first and most common way is soft proofing. The second method is to convert the Color Space of an image to the ICC Profile for the destination output device. We will discuss both shortly.
ICC Profiles are a necessity for any color-controlled workflow. They give you a good idea of what you output will look like when soft proofing, and definitively tell the device how to render images when the ICC Profile is used as the image’s working Color Space.
Most ICC Profiles account for both the printer being used and the type of paper that it prints to. Some are more general and only define the parameters for the color gamut of the printer, but most also account for the paper’s response to the printing process. Printer manufacturers often provide ICC Profiles for their printers as well as their private brand paper stock.
If you need an ICC Profile for a third party paper manufacturer, they often provide profiles for their paper with a combination of common printers. If you are using a printer and paper combo not supported by either the printer or paper manufacturer, you may have to buy a custom profile from a third party specialist.
If you send your prints off to a lab, ICC Profiles are important as well. Most high quality labs offer ICC Profiles for all of their printer/paper combos. AdoramaPix offers up their ICC Profiles here, ready for download and use. You lab of choice should have ICC Profiles ready and available on their website, often with instructions for sending off self-color corrected prints.
Most labs will ask for images to be sent in sRGB format and only use ICC Profiles for soft proofing, few will recommend you to convert your images to their ICC Profiles before sending. Be sure to double check with your lab before sending off that big order.
Now that you know where to get your ICC Profiles, you have to know where to install them.
Mac OSX
- Storing profiles in /Library/ColorSync/Profiles allows all users to use them.
- An alternative area, for users without Admin privileges, is /Users/Library/ColorSync/Profiles — profiles stored here are available only to the current user and are not available globally.
- The ColorSync Utility gives access to the details of individual profiles, can rename profiles, validates profile structure, and allows you to view the gamut plot outline.
Windows XP/Vista/7
- Point your explorer to Windowssystem32spooldriverscolor. This is the storage directory for ICC Profiles. You can copy ICC Profiles directly into this folder and they will be available for use upon system restart.
- If you do not want to restart, the easiest way to install a profile in Windows is to right click on the profile in Explorer and select install profile. Windows copies the profile to the profile directory for you and makes it available without restart.
- If you are replacing a profile in Windows, you cannot overwrite the previous profile using the install profile option. You must go to the profile folder and manually delete the old profile before you can install the new one.
Now that your have your profiles installed you are ready to use them. We are going to be hanging out in Photoshop today, so you can close out Lightroom.
In Photoshop, you have the ability to Soft Proof your images. This is forcing Photoshop to render the colors in an image by the rules of an installed ICC Profile. This can give you a general idea of how your image will look as a final print.
To set up Photoshop for Soft Proofing, you will need to select View from the menu and select Proof Setup >> Custom…
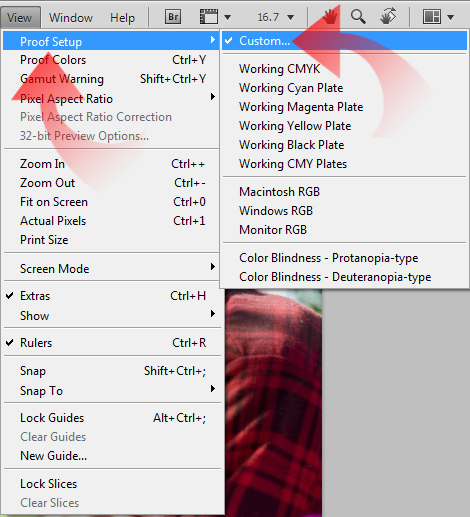
This option fires up the Customize Proof Condition dialog.
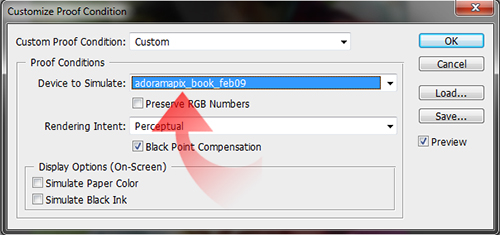
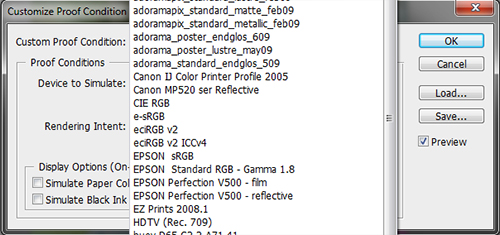
From here, click on the Device to Simulate dropdown. It brings up a list of all ICC Profiles currently installed in your system.
Select the profile you will be targeting for your image for output. I chose the AdoramaPix Photobook profile. Now make sure you have Preserve RGB Numbers unchecked and Black Point Compensation checked.
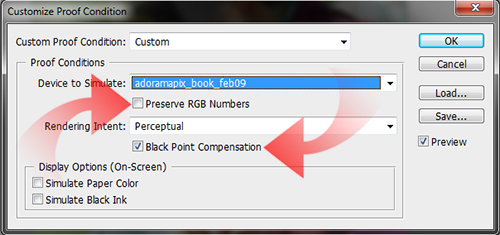
This allows Photoshop to adjust the images colors as need to provide a proper render of possible output results. You now have Soft Proofing configured.
To start up your proofing session use the keyboard shortcut Ctrl/Cmd+Y or use the menu and select View >> Proof Colors. You normally will see a slight shift in color.

In the above image grabbed from my screen, the left half is the image in sRGB and the right is the same image soft proofed with the AdoramaPix Photobook profile. The red arrow points out the split in the image where the difference is most notable.
Now here is what is cool about Soft Proofing. You can further edit you image in Photoshop while Soft Proofing. This allows you to temporarily work with your image in a color space simulating your output device. This allows you to perfect your output.
To get more in depth in Soft Proofing, I recommend you read Dry Creek Photo’s Introduction to ICC Profiles and Their Use. Their article goes well past the overview I am doing here and gets into the gritty detail.
Now, depending on your needs for either your printer or lab, you may need to convert your image’s color space to the output profile. I have discovered that sending my plain sRGB image file to Adorama or my local lab works just fine, no need to install the profile into the image. Soft Proofing is accurate and works fine and my output comes back almost exactly like what I saw on my screen.
However, some printers and labs my want you to convert your image to the ICC Profile for print. This can be time consuming to do, so I would only do this if the lab needs it or if it is the only way to get accurate results from your printer. If you need to do this, simply follow these steps.
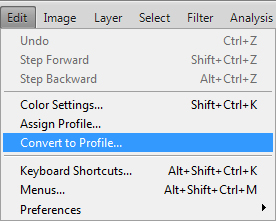
Select Edit >> Convert to Profile… from the menu bar.
Now, in the dialog box, change your Destination Space Profile to the ICC Profile you are converting to. Make sure to check all three options presented to you at the bottom of the dialog, as indicated in the following image.
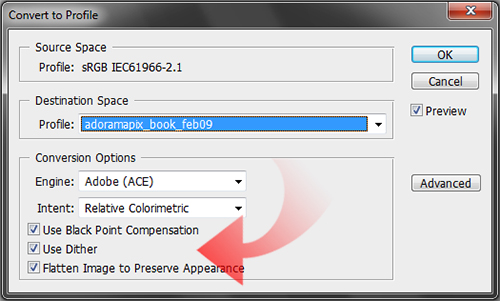
If Preview is checked, you can move the dialog box and view the changes on the image by checking and unchecking the box. Once you are done, simply click OK.
Do not save this change to your original image. Use Save As and append the profile name to your image name. Converting profiles is a lossy process and doing so repetitively will damage your file. Only change it once, Save As, and close. Keep your original image unchanged.
If you are converting an image to your own inkjet’s ICC Profile, make sure that you turn off any automatic color correction, as this will give you a double dose of adjustment and trash your image.
As I said, you don’t always have to convert the Color Space. Most labs are set up to receive only sRGB files and their propriety ICC profile is simply for soft-proofing. Rarely will you encounter a need to embed an ICC profile into an image, but it is good to know how to just in case.
Again, refer to Dry Creek Photo’s Introduction to ICC Profiles and Their Use, as well as the other topics they link to about color correction, printing and ICC profiles. Although some of the information may be a tad out of date, it is still solid information that pertains to everything we do today an into the future.


