In this first part of the series we will be looking at how to use the Import Controls in Lightroom 4 for importing, organizing and creating back-ups of your images.
The most important thing to remember when reading this series of blog posts is that the way in which I take my images through Lightroom. Tailoring the process to your own needs and requirements to make the process more efficient for you is the most important take-away.
File types
Within Lightroom there are 3 main file types you will come across when editing images:
- RAW (.NEF, .CR2 etc) which tend to be propietry to the brand or individual camera you are shooting with.
- DNG stands for Digital Negative and it is Adobe’s own open raw format.
- JPEG files which are what most people will be most familiar with.
Most professional and prosumer photographers (except those shooting super high bulk work like event photographers) will be shooting in RAW format on their camera.
RAW is a lossless format compared to .JPEG which is a lossy compression format. Shooting in RAW allows changes such as white balance to be made latter without image degradation.
The only downside to shooting RAW, and the reason it is not used for bulk photography, is the larger file sizes. In my experience RAW files can be at least 3-4 times the size of their equivalent .JPEG
Unlike .JPEG and RAW files, many people may not be too familiar with .DNG files. The ability to shoot .DNG files varies between cameras and most Nikon and Canon cameras do not have the ability to shoot in .DNG file format. You may ask why would you bother to convert your files into .DNG?
Currently, I tend to store all my images in their native RAW format rather than converting to .DNG however those who do convert upon import argue that because .DNG is an open format and therefore does not require a license, it is more likely to be ‘future-proof’ and who is to say that Canon and Nikon will still be supporting .NEF, .CR2, .CRW etc files in the next few decades?
The main benefit in .DNG files for me as a travel and cultural documentary photographer is the fact that .DNG files have their metadata embedded into the files themselves rather than RAW files who store their metadata in a separate file such as XMP.
This reduces the chance of accidentally deleting, moving, renaming the XMP file and loosing a lot of time consuming work. .DNG files are something I am going to seriously consider in the future and maybe something I will trial in my work this year.
The Import Process
The process outlined below is the method I use when importing images from a memory card. The most important step in the whole process is making a second copy. Backing up images is something that many photographers learn about the hard way, don’t be a fool and make sure you backup your images!
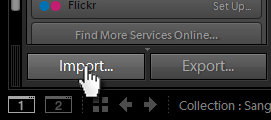
1) Down at the bottom of the right hand side panel in Lightroom you will find two buttons, Import and Export, the Import button is the one that we will be focusing on today. When you click on the Import button you will be greeted by a pop-up window which is the import menu. This is the main window for controlling how you import your images into Lightroom.
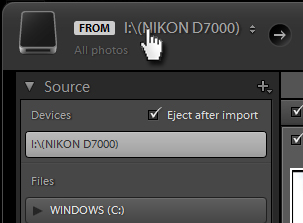
2) At top right of the Import Menu window you will see a section headed ‘From’. This is where you choose the location of the files you wish to import into Lightroom. For this post we are looking at importing from a memory card. Therefore you need to select the drive in which you memory card is inserted.
For this example that was my I: drive. When importing I like to have Eject after import clicked so that it tells me when I can safely remove my card.
The process for importing images from a hard drive or a folder on your computer is very similar in the fact that you just click the location of your files in the From section the same as you did with the memory card. The only difference comes later on when selecting whether to move, add, copy or convert the files upon import.
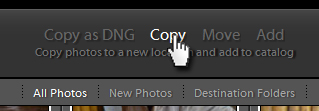
3) Along the top of the Import Menu window you will see that you have 4 options of what to do with the images you are importing. If you wish to convert to .DNG upon import you will need to select Copy as DNG.
Currently, as I don’t convert my images to DNG I select Copy as it allows me to create a copy of my files onto a hard drive. If you are importing images from your computer or from a hard drive you may wish to select Move or Add.
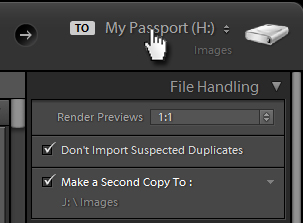
4) The next step is selecting the destination of the copy you are creating of your images. This process is identical to selecting the location of your images. When I am working, whether that is in a different country or at home I always make sure that I have a further two copies of every image before deleting them from the memory card.
The system I employ when working in the field is to use two hard drives, in this case WD MyPassport drives.
One drive is named My Passport and the second drive is named My Passport Back-up‘.
A great feature in Lightroom is the ability to Make a Second Copy To: which allows you to back-up your images to two drives at the same time as importing the files into your LR catalog.
A second thing to consider if how you want LR to render previews. You can chose from:
- Minimal – Very small preview
- Embedded & Sidecar – The existing previews
- Standard – This can be set in Catalog preferences
- 1:1 – 100% previews
I like to go with 1:1 as it is really handy to have them when editing. The only downside is that it takes up more memory on your computer and takes a lot longer on import. However I find that the time taken to import is worth it for the time advantage you get when editing.
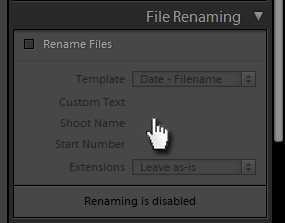
5) After you have chosen how you wish to backup your images and render them in your catalog, the next decision you have is how you wish to rename your images. I find that renaming the images later is much better as you can tailor the name to each individual image rather than going for a generic name. Some examples of naming ideas are place names and countries and subjects name and date of shoot.
You can rename them here if you import is of a specific set of images but if you are importing all your images from a trip in one go you may want to rename them later.
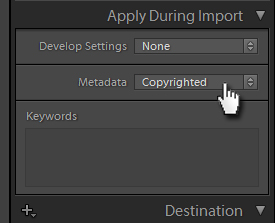
6) Apply an import metadata preset is probably the second most import step in the process for me after I have backed up the images. It is a simple way to add copyright, licensing information and contact details to your images automatically upon import.
To create a new present you click in the metadata field and select new from the drop-down menu. You then just have to fill out all the generic information you wish to apply to your images on import. The key to remember is to only tick the ones you wish to change because if you click a field which is empty it will remove all the existing metadata from that field
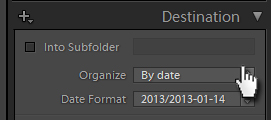
7) The final step of the import process is to choose how the images will be organized in folders you have chosen for them to be copied to. With this section you can control the folder structure. As I control all my images through Lightroom, I very rarely go into the folder structure and therefore I just leave it organized by year and date.
I do know of some photographers who will create a folder structure based on the location of the shoot and this can be done by selecting Into Subfolder and then typing your own structure system.
Hopefully by now you should have a solid understanding of how to control the import of your images into the Lightroom catalog. The ability to set the automated metadata presets and folder structures, is where Lightroom is worth its weight in gold.
Part two of this series will focus on organization in the Lightroom library through the use of Collections, Flags, Ratings and Colors.


