A while back we discussed the relationship between the Histogram and the Tone Curve but considering some e-mails and interactions we have had with our readers it seems we should spend a bit of time looking a bit deeper into the Histogram itself. We will take a quick look at what the Histogram tells us, how to utilize Lightroom’s Histogram features and how to use the histogram on your camera to help you make better overall exposures.
A histogram, be it in Lightroom, another application or your camera, graphically depicts your image’s overall tonality. Presented as a bar graph, the histogram allows you to view the range of tonal values in an image in an abstract manner. When viewing a histogram remember the X-axis of the graph (the horizontal base of the histogram) depicts image brightness, running from complete shadow on the left to blown highlights on the right.
Histograms that are cut off on the left will have blocked up shadows and those cut off on the right will have blown highlights. The goal usually is to contain the entire range of the image’s graph in between the two extremes, which preserves the most image data.
Understanding the essential basics of reading a histogram we can now start to actually analyze them proficiently. The way the histogram is shaped tells a lot about an image’s exposure and contrast and can help you find image issues, such as highlight and shadow clipping before you export you image. Consider the following series of histograms.
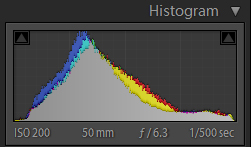
The above histogram is from a fairly well exposed image, with quite a bit of darkness in the background. Notice that the histogram depicts the mild darkness in the image by depicting the image data shifted slightly to the left of the histogram. Another indication of image qualities is that the graph makes one smooth hill towards the middles of the histogram. This trait denotes a rather low contrast image, which is common for a properly exposed raw image.
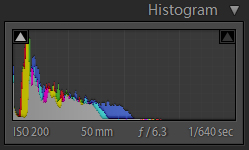
This histogram shows a severely under exposed image. As can be easily seen, the histogram graph is cut off by the left boundary of the histogram, denoting shadow clipping. The small triangle in the upper left corner is lit up, denoting the existence of shadow clipping, which will lead to blocked up shadows in a printed image. The right most edge of the graph cuts off in the middle of the histogram, denoting a complete lack of highlights in the image.
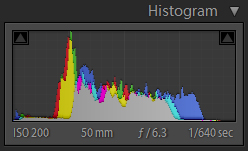
This sample is the same image as the prior histogram, with a +1.71 Exposure modification. Now the graph is more evenly distributed between the shadows and highlights, covering a wider range of tonality. However there is a lot of empty space to either side of the graph, as it tends to clump towards the middle of the histogram. This is another sample of a low contrast image.
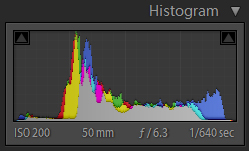
Again, the same image, but this time the Tone Curve was altered and the Contrast are increased to create a more high contrast image, making the image more appealing visually. As the graph depicts, the left and right side of the graph are now raised in comparison to the middle range of the graph. The prior histogram showed a relate equality across the graph, but now the two sides are enhanced whilst the middle is depressed. This is the histogram shape for a higher contrast image.
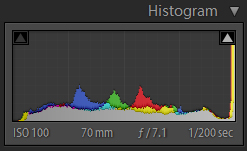
This final sample histogram depicts a rather well exposed image, albeit low contrast, with one glaring issue. The sky in the frame is completely blown out, as can be seen by a large bulk of the graph being pushed up against the right of the histogram, as well as the highlight clipping indicator being lit in the upper right hand corner of the histogram.
The goal usually is to contain the entire range of the image’s graph in between the two extremes, which preserves the most image data.
The series of histograms presented above should give you a good indication of how the histogram shifts from image to image and what the differing characteristics of the histogram imply. As you consider this information, also remember that this is strictly a scientific representation of technical data culled from your image. While modeling the real world data, it does not account for artistic needs in the least.
Use the histogram as a tool and guidance, but do not let it rule your images. One of the first rules of photography is to learn all the rules and learn when to break them. A perfect histogram is not always visually desired in your final product, but it does help to start out with a good histogram.
Now that we have covered how the histogram appears and how it reacts to images, lets look at how the Histogram in Lightroom is more than just a histogram. It is a tool for modifying your images all its own.
When you hover your mouse over the histogram, you may notice a part of the histogram gets highlighted. The Histogram is broken up into four zones, each tied to a Basic Tone slider. Follow along and see them.
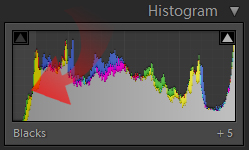
Starting from the left side of the Histogram, the first region of the image to get highlighted. Holding down your mouse button in this highlighted zone allows you to move you mouse left and right, allowing you to reshape that region of the Histogram. In reality, your manipulation of the Histogram in this location alters the Blacks slider in the Basic Tone panel in the Develop Module. To think of it in simple terms, the deep shadows of your image (the left most region of the Histogram) is controlled by the Blacks slider.
The text at the bottom of the Histogram even states Blacks and displays the current value of +5.
As you make changes here, the slider below will automatically adjust.
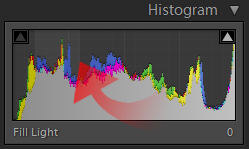
The next zone you come to controls Fill Light which is the tool that controls the shadow to mid-tone range of the Histogram. Again, holding you mouse button and moving it left and right will adjust the Fill Light to brighten your image, while moving the histogram graph to the right. As you manipulate the Histogram directly, notice that the highlighted regions do not alter, they remain the same while moving the histogram graph itself though the Histogram.
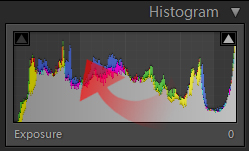
Moving on, the mid-tone to highlight range is controlled by Exposure, and directly manipulating this zone will alter your Exposure slider.
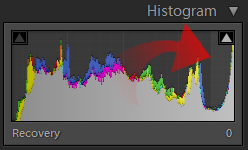
The final adjustment zone in the Histogram is the bright highlights and the zone adjusts Recovery.
Using these adjustment zones directly can help you quickly shape up your Histogram as you desire, without having to directly adjust the sliders. Making image changes in the Histogram allows you to utilize these four Basic Tone sliders as one tool, as opposed to individual sliders. Directly manipulating the Histogram may feel more natural to some people and I recommend everyone try it and see it if works for them.
There is a technique you can use to get high quality images, with a histogram profile that is very conductive to use in a Raw workflow.
There are two more features of the Histogram that most everyone is aware of, but I will go ahead and cover it briefly. These features are the Shadow Clipping alert and the Highlight Clipping alert. These tools live in the upper-left and upper-right corners of the Histogram, respectively. When no clipping is occurring, the tools are present as a gray triangle on either side of the Histogram, however when clipping is present, the appropriate triangle will turn white to alert you of the presence of clipping.
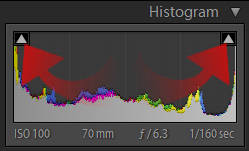
The above histogram indicates that there is both Shadow and Highlight Clipping present in the image. You can now adjust the Histogram to alleviate the issue, hopefully eliminating the clipping. However you may want to see where the clipping is occurring in you image. Simply click on the triangles that are white to enable the in image alerts.
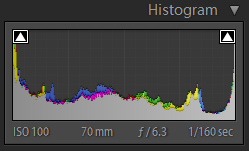
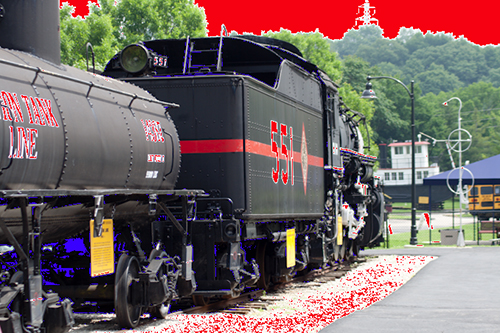
Now you can simply look at your current image and the clipping will be highlighted for you. Shadow clipping is denoted by a blue overlay while highlight clipping is denoted by a red overlay. As you adjust your sliders or Histogram, you can watch these overlays shrink and grow until they hopefully shrink into oblivion.
That pretty much covers the basic of reading and manipulating the Histogram in Lightroom. There is more to discuss however. It is all fine and dandy to fix your Histogram in Lightroom, but as always it is much better to get it right in camera. It is quicker and easier to do so and the image quality is usually much better when you get a balanced histogram in camera than it is when you push and pull Raw data.
There is a technique you can use to get high quality images, with a histogram profile that is very conductive to use in a Raw workflow. It is called exposing to the right. Essentially when you are shooting you want to have histograms on your images that push up towards the right edge of the histogram without incurring clipping.
Exposing to the right helps to maintain good shadow detail in your images, and once you get the hang of it, you will also avoid highlight clipping when done properly.
To do this method, you may have to overexpose a hair, but usually not too much. The trick is to check your histogram after shooting to ensure that the histogram is as far to the right as it can go without clipping. It is especially helpful to have zebra striping on a preview of the image at the same time to let you know if you blew out highlights. After shooting this method for a while you will get the hang of the process and be able to do it with less chimping.
The reason to Expose to the right for a Raw workflow is simple, to garner as much image data as possible. The images right out of the camera my look a bit over exposed, but as long as there are no blown highlights, you can quickly perfect the image in Lightroom. It is easy to darken an image and maintain image quality, but as you brighten images they can incur noise.
So, if you are exposing to the right, your image will tend to be slightly overexposed on import, but you will rarely incur shadow clipping allowing you to maintain all your shadow detail. You may not always need to use this method of exposure, but it can help immensely with tricky exposure, especially high contrast situations.
The problem many encounter with this method is that your camera generates its histogram from jpeg data, not Raw data. Exposing to the right has failed to work for many because of this. But the fix is simple, reduce your on camera Contrast and Saturation.
We all know that image settings in camera do not effect Raw data at all. Only ISO, shutter and aperture (sometimes D-Max adjustment as well), adjusting your on camera Contrast and Saturation will only effect Jpegs and your previews, including the histogram you see after every shot.
Reducing your Contrast and Saturation helps bring the preview more inline with the actual Raw data, which is critical when exposing to the right. If you are judging your histogram on camera while it is using a built in picture setting or the default settings, you will show clipping in the histogram before it ever actually occurs to the Raw data.
Depending on the level of adjustment in camera, this processing can make using the on camera histogram a futile effort. At best it creates minor differences between the preview and the actual Raw data, at worst it makes exposing to the right absolutely useless.
On my Canon, I found reducing my Contrast and Saturation to two clicks below the middle setting gets my on camera histograms reasonably close to what I get on import in Lightroom. It will require a bit of experimenting with your camera and Lightroom, but once you match up the camera histogram with Lightroom, you will know what you have to work with in the field and not have to wait to upload to Lightroom to know if the image turned out the way you desired.
If you shoot only Raw, save these as the default settings. If you shoot Jpeg as well, you may want to set your Expose to right settings as a custom picture style.
If you experiment with Exposing to the right and configure your DSLR properly you may be amazed by the amount of range you can capture with your camera. Exposing to the right allows you to maximize your use of your sensor’s dynamic range, getting the most tonality possible out of every image. The more information saved in the Raw file is simply more information available to you in Lightroom, making adjustments easier and image quality better.
Combining the knowledge of how the Histogram works, along with how to manipulate it will make your development sessions easier than ever. When you include techniques such as Expose to the right, you will maximize your ability to manipulate the Histogram and create technically better images with more image information than you would have under normal circumstances.
Hopefully you can spin all this information into your workflow and maybe make your images just a bit better than they were before.


