Have you ever been working up an image in Lightroom, and open it in Photoshop for final editing? Furthermore have you ever invested time in retouching said image in Photoshop only to realize that you should have processed the RAW image differently to begin with? A lot of people would just close out the image and start processing the original RAW image again in Lightroom or Adobe Camera RAW.
Luckily for all of us, Adobe offers everyone another option for their RAW workflow for Photoshop. By embedding RAW files in smart objects in Photoshop, you can work on your image but retain the ability to alter the original RAW file as needed. Smart objects are truly an option for those of us afraid to commit to our edits.
Raw files have to be place into a smart object to be used with Photoshop. You have a few options here; place the RAW file from Lightroom or directly from Photoshop (placement from Bridge is also possible). Utilizing Lightroom to place a smart object is easiest, as it creates the proper image size in Photoshop for the RAW file.
Placing from Photoshop requires you to create an empty image, place your RAW file of choice, and the resize the canvas to your desired size, and then resize your smart object. In other words, placing in Photoshop can be a pain. Lightroom makes this pain free, so we are going to assume you are working from Lightroom and editing in Photoshop.
Opening smart objects from Lightroom is as simple as it can be. Once your image is processed and ready to be exported into Photoshop simply right-click or control-click on the image to bring up the contextual menu. From here select “Edit In” as if you were going to open the image in Photoshop.
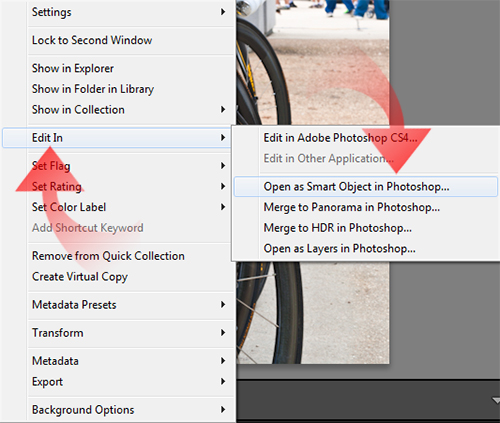
Instead of selecting “Edit in Photoshop CS…” choose “Open as Smart Object in Photoshop…”. There are no dialog boxes to deal with; Lightroom just sends the RAW file directly into a Smart Object layer in Photoshop, with Lightroom adjustments intact. From here you are ready to start editing in Photoshop.
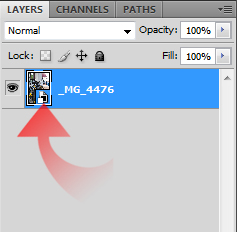
Once you are in Photoshop, the layer looks like any other in your layer palette. The description is by default the filename of the RAW file. The only note that the layer is a smart object is a small paper and box icon in the lower right corner of the thumbnail. Double click on that icon and Photoshop will throw you right into Adobe Camera Raw with the RAW file you embedded ready to edit.
Once in ACR you can make any edits to your image that you would normally do in Lightroom.
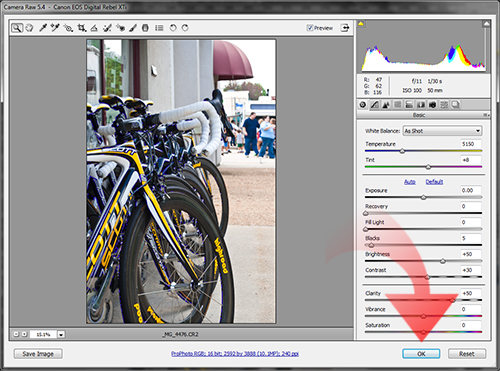
Remember, Lightroom and ACR have the same basic options and share the same rendering engine; they are just laid out differently. After you make any changes to your RAW image, click “OK” . Photoshop will now reprocess the RAW file and drop a freshly processed version of your image into the Smart Object layer in Photoshop.
Here is where you can start getting fancy. You can duplicate your smart object (using ctrl/cmd + J), creating two independent versions of your RAW file in your image.
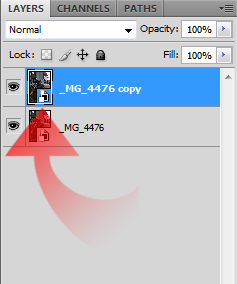
You can then edit each file differently in ACR, such as tweaking one for good exposure on the subject and adjusting the other to desaturate the background. Then you can apply a mask to the layers to blend the two together. Layer masks will work without having to convert your Smart Object into a Rasterized Layer, so you can continue to tweak your RAW files in ACR until you get it perfect.
A limitation of Smart Objects is that you cannot directly manipulate the pixels of the Smart Object. This is good from a non-destructive workflow point of view, but can hinder your ability to complete common tasks in Photoshop. If you select the Filter option in the menu bar, you will notice many options are grayed out, indicating that they cannot be utilized.
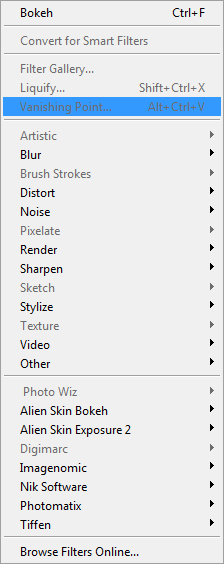
Filters that are available can be used as Smart Filters, which apply their effect non-destructively. Again, this is good, as you can continue to manipulate the original smart object in ACR as needed and the layers will update.
Make note, many third party plug-ins will not work. They will be grayed out in your Filter menu as well. Only plug-ins that supports Smart Filters will function when utilizing Smart Objects in Photoshop. The upside is most popular plug-ins utilizes Smart Filters, although their results may be different than when utilized normally.
When you finally reach the point in your editing that you no longer need the Smart Object feature, you can simply Rasterize the layer, effectively making it a normal, bit-mapped layer.
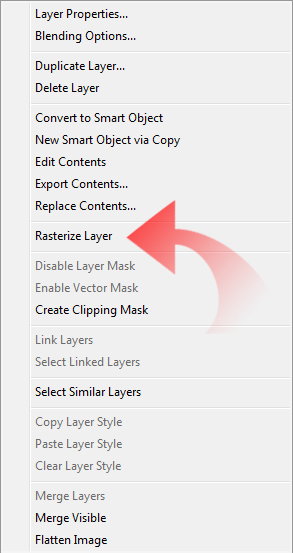
Always put this off as long as possible, as you don’t want to remove your flexibility too early.
When you save a document with Smart Objects still intact, you will need to be cautious. If you started the Photoshop session from within Lightroom, choosing “Save” will render your current image into a TIFF and drop it back into Lightroom ready to go.
However, if you want to maintain your Smart Objects and layers, you will need to select “Save As” and then be sure to save in the PSD format for maximum compatibility. Also, you will need to be aware that a PSD saved with multiple Smart Objects and a few Smart Filters will quickly bloat size wise. However everything needed to edit further is hadily packaged into the PSD file.
I hope this has helped some of you to discover the capabilities of Smart Objects in Photoshop. I am sure many of you already knew how to do this, and know many more advance techniques utilizing this feature. I just wanted to write a nice introduction to the utility. Smart Objects open a whole new world of possibilities with Photoshop, re-editing RAW files is just the tip of the iceberg, but of most interest to photographers.


