I’m constantly on the search for the smoothest and quickest way to process images.
That’s it, nothing fancy about it.
I like speed, accuracy, and quality. Can they all be wrapped into one workflow that can take care of the majority of my shoots? – I certainly think so!
This little gem of a workflow has been in my bag ‘o tricks for quite some time. It’s quick, easy, and works in both color and/or black and white modes.
I’m exposing this particular workflow because I think there are numerous ways to attack portraiture work, and I’d like to know more about how those of you out there are leveraging any particular techniques I might consider or that you’d like to share with our community.
We’re 100% open source here at XEQUALS, this is our workflow, no surprises or hidden agendas – this is how we do it.
As always, let’s start with a quick before and after:
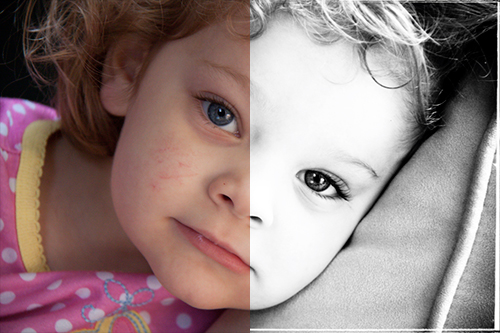
Now let’s look at the original image:

Since I’ll be converting this to black and white, I’m happy with the color of this shot pre-conversion. If you’re a stickler for color, I strongly suggest you create a camera profile for your lighting conditions as a way to save you time and effort in your future workflows. We have taken color profile creation to the next level.
A few issues I want to fix in this image:
- clean up blemishes on the cheeks and nose
- overall – smooth out the skin
- increase exposure
- increase the blacks
First I’ll send this shot into the dreamy black and white universe I like to call XEQUALS Super Punch.

Through this conversion process, the blemishes have been somewhat resolved. This is partly because the XEQUALS Super Punch preset bumps the exposure and blacks up a bit. But let’s say you don’t use the preset (because you like doing things the hard way). Where would you attack these issues?
I’m a firm believer that in these instances the Exposure slider is your friend. If you are hesitant to tweak your exposure across the entire image, Lightroom allows you to work in what is called ‘target adjustment mode’ (or what I often refer to as ‘direct edit’). This will allow you to select just those areas where you want to increase exposure (such as the skin tones), while leaving the rest of the image unchanged. I discussed the use of this tool here.
Here’s our image after some more (positive +) adjustments to the exposure:

Exposure and/or targeted adjustments will only get us so far in our example. Now it’s time to attack those blemishes with the Spot Removal tool. By using keyboard shortcut N while in the Develop Module, we can make the bulk of our remaining blemishes disappear:

Now we’re looking REAL good:

Now, before we call it a day and pat ourselves on the back, I want to take a moment to introduce a technique for smoothing skin that is by far the easiest way to get your feet wet with this type of retouching.
The truth is, even in the most complex of jobs this technique pretty much does it all for me!
To begin, head over the the Develop Module (shortcut key D), and select your Adjustment Brush (shortcut key K):
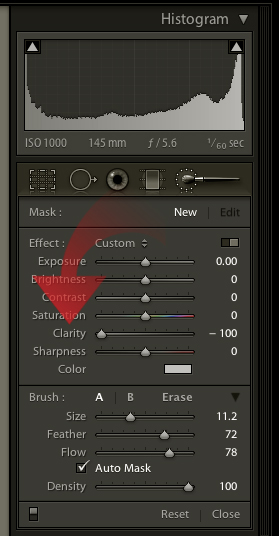
I set the brush up with the following settings:
- Clarity: -100 (this softens the brush perfectly)
- Size: 11.2 (set this based on your needs)
- Feather: 72 (this determines the fade on the brush from the brush edge outward to your image)
- Flow: 78 (this determines how much of the effect is applied as you repeatedly brush over the image)
- Auto Mask: (confines brush strokes to areas of similar color)
- Density: 100 (controls the transparency of your brush strokes)
With this minimal set of settings you have an extremely powerful retouching tool. Now it’s time to rock!
I normally to run the Adjustment Brush over-and-over the image in particular areas to ‘build up’ the effect, which is why I think the Feather , Flow, and Auto Mask settings are important to get dialed in properly for your image and the effect you are trying to achieve. For even more control over the ‘build’ adjust the Density slider as needed.
With my settings in place, I start on a medium gray portion of my image:
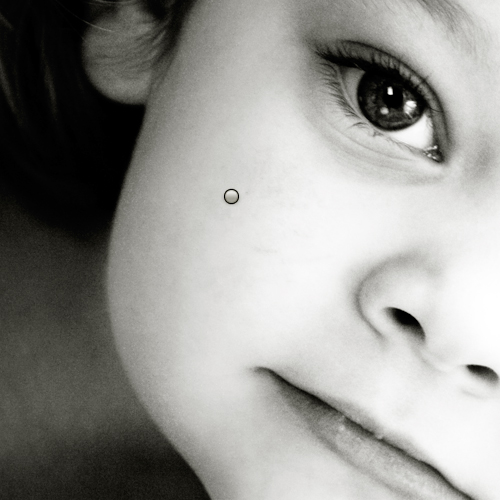
… and work my way to the light and dark portions of the skin:
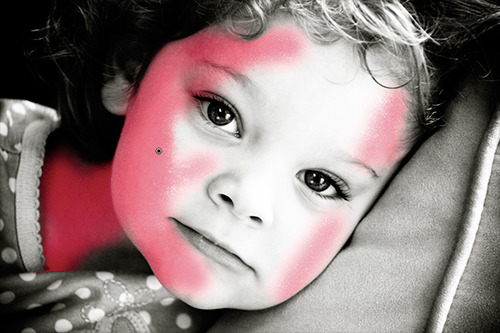
You’ll notice the areas more saturated in red define where multiple brush strokes have been used to soften the skin. If you use a Wacom Intuos Pro Pen and Touch or something similar you’ll especially love how free-from you can be with this tool.
You can preview your work by turning the red overlay on or off by pressing shortcut key O.
And with that we have our final image:

So we really DON’T need no stinking Photoshop to do some highly targeted retouching on any image – and in a non-destructive manner!
Workflow’s are like recipes – the key ingredients are crucial to the meal, yet the blending of those ingredients is where the unique flavors come together to make that meal special and unique to your style – which is exactly what we have explored here.
I hope I’ve opened your eyes to some of the complimentary activities that can be leveraged between Lightroom and Photoshop without requiring much additional work to add some great final touches to your images.


