Do you use sharpening in Lightroom? It’s alright if you said no.
It’s one of those photography tips that isn’t talked about a lot. As I browsed the internet I have discovered than not many people actually utilize Lightroom to sharpen their images, even if the image was processed in Lightroom.
There seems to be a stigma surrounding Lightroom’s sharpening abilities, which I believe likely stems from the subpar sharpening once used in Adobe Camera Raw.
Even I felt that Lightroom was not suitable for sharpening, that is until the release of Lightroom 2.0, when I noticed a discernible difference in the quality of the sharpening tools.
Utilizing the Develop Module sharpening tools let’s you creatively sharpen your images with an impressive level of control and feedback.
In part 1 of this 2 part series, I’ll walk through a sample workflow to expose the power and flexibility of the sharpening tool within the Lightroom Develop Module. In part 2, I’ll explore the ability to sharpen your images on export (ie. output sharpening) which offer its own set of features.
The 2 Types Of Sharpening In Lightroom
First, you have your Develop Module Sharpening, which offers you a fine degree of control over the sharpening process. Alternatively, the export dialog offers you an Export Sharpening option, which I’ll cover more in Part 2.
However, when you take an image seriously, you should really take control of the process, and this is where the sharpening tool in the Develop Module becomes crucial. Utilizing the Develop Module sharpening tools let’s you creatively sharpen your images with an impressive level of control and feedback.
Alright, let’s get down to business.
The Business
In Lightroom, choose your image you are going to work with and head into the develop module. Process it as you normally would. Once you like what you got zoom into an area of high detail. If it is a portrait zoom into the eyes, otherwise zoom into a detail area that looks a bit soft around the edges.
You will want your main window at 1:1 zoom so you can actually see the effects of sharpening. You may want to even zoom in more as you adjust your sharpening, but 1:1 seems to be the best zoom to work at.
Now, open your develop module and scroll down the right panel to the detail tab, if it is not already open, click on the label to access the tools:
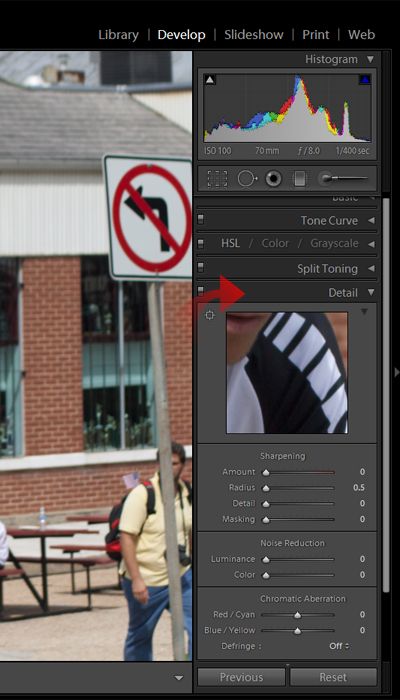
Once you are looking at the detail tab, look to the left and right side of the word Sharpening:
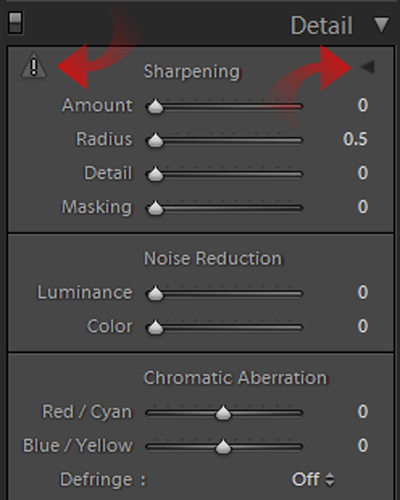
On the left you may see an exclamation point in a triangle, which is letting you know that you must be at a 1:1 preview to see the effect of the detail tools. If you click it will automatically take you to a 1:1 zoom. On the right will be a small black triangle. If there is no preview box visible, clicking it will open a 1:1 preview box in the Detail tab itself. Below the Sharpening heading, you will notice the four tools we are here to discuss; Strength, Radius, Detail and Masking. These are the tools we came to play with.
These four tools can be used in any order, but we will discuss them in the order that is listed. Once you understand how they function, and how to utilize Lightroom’s tools for them, experiment with their order to suit your personal workflow.
Strength
The Strength slider controls the intensity of the sharpening effect. When you look closely, the effect of the slider is to increase contrast in the locality of the edges. In Lightroom, this scale will run from 0 (no sharpening) to 150 (maximum sharpening). I recommend setting this to a medium setting, between 50 and 70 as a starting point, as the related tools will not function without a level of sharpening defined.
Move the slider back and forth and watch the changes in edge definition, surprisingly noticeable. However if you are having a difficult time noticing the difference, Lightroom offers help. Hold down the Option (Mac) or Alt (Win) key and click on the Strength slider:
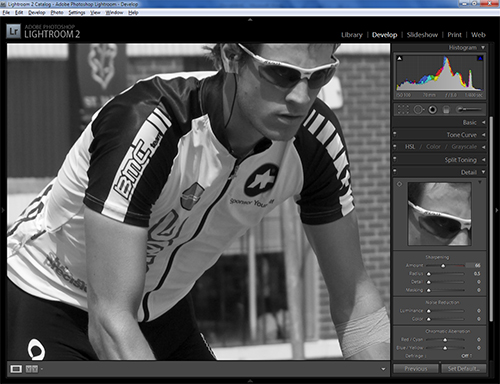
This will make the image temporarily monochrome so you can see the sharpening effect without color, which will help your eyes see the enhancement more clearly. Adjust your strength until it looks alright, you will come back to strength often as you adjust the other tools.
Radius
The Radius slider controls how far out from the edge that the sharpening will be applied. The measurement is in pixels, ranging from .5 to 3.0 in Lightroom.
Radius can have a profound effect on an image if overused; causing strange halos around edges is set too high. Start out with a small radius, such as .7 to 1.0, which will constrain the sharpening closely to the edge.
Slowly move the slider up, paying attention to the edges, make sure they do not start producing excessive artifacts. Adjust until you feel it looks good, keeping in mind that you want a noticeable effect while keeping it as subtle as possible. Determining the adjustment level can be tricky, so you can press Option/Alt while adjusting the slider to activate Lightroom’s preview mode:
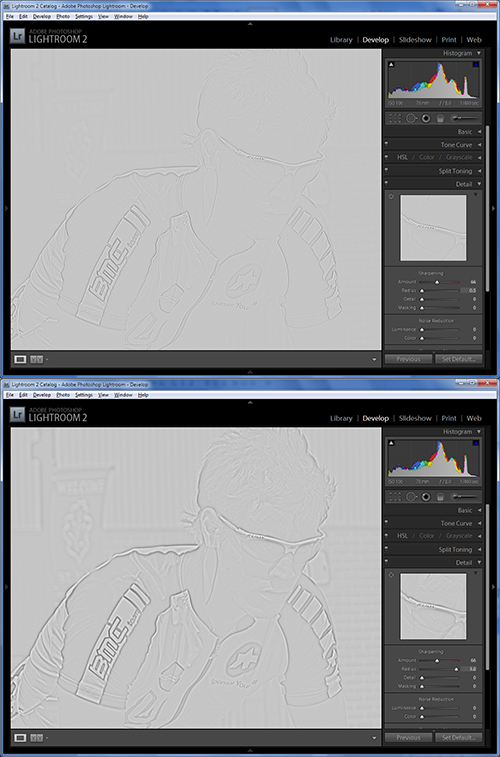
This image shows the preview in two states, the top shows a radius of .5 whilst the bottom shows a radius of 3.0.
As you can see, the preview can make quite a difference, and show you what is being altered in the image. Use this preview tools judiciously.
Detail
The Detail slider controls the amount of detail that is to be sharpened. The scale runs from 0 (major edges only) to 100 (every discernible edge). Your use of this must be balance between how much detail you want to expose. If you use a heavy amount of Detail on a portrait, you are going to bring out every pore and wrinkle on the poor subject’s face.
However, heavy use of detail will go a long way in architecture, technical and landscape photography, bring fine detail to attention.
Be aware of this effect at all times when sharpening. Again, adjust according to taste, but remember the Option/Alt preview, which is even more important when looking at fine details:
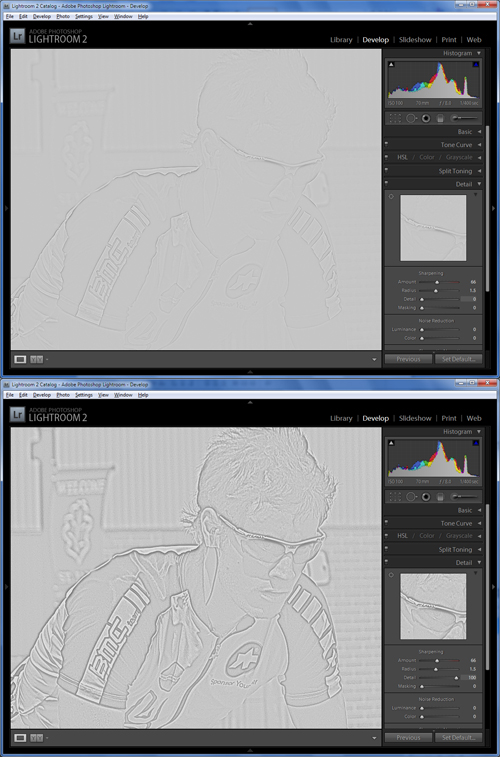
Again the image shows a value of 0 in the top and a value of 100 in the bottom to show you the extremes of the effect. Even at the smaller size you can see the difference of the details affected by the tool. Just like the Radius preview, if you can see it in the preview, it is being affected by the sharpening tools.
Just remember to go easy on people when using the detail slider, but if you must apply a lot of detail you have two options to save the subject from an unflattering representation: Either use a local adjustment brush on the skin to apply Negative Clarity, or use our next tool, Masking. There will be a time and place for both options.
Masking
The Masking slider is probably the most versatile tool in your sharpening bin. It controls where an image will be sharpened. Again the slider runs from 0 to 100, but I do not feel that the tool is very useful without the option/alt preview.
It is useless to show a comparison, as 0 will be a white screen and 100 will be almost black with just a white outline. The preview you are looking at shows a Masking level of 62:
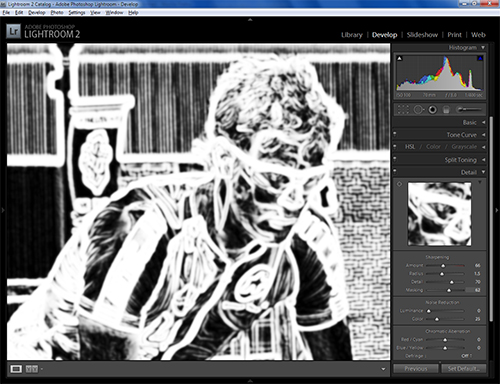
Where you see black, no sharpening will be applied, regardless of the settings of the other tools. Where there is white, sharpening will be carried out. This is handy, especially when you need extra detail sharpening, however you have a human subject in the image.
The tool functions a lot like masks in Photoshop, with the exception being that they are not user-defined. Lightroom will decide where to mask; all you control is how much it will mask. Again, if you need to soften a part of the image that you cannot mask away, you can always apply some local negative clarity.
All Together Now
Now that you have seen what each tool does, use them in unison to make your image sing. I would recommend starting with a moderate strength and low radius, and then adjust the detail until you are seeing the level of detail you desire.
Go back and adjust the strength until you get the definition you are looking for, if you have to go much over 100 though, consider backing off and increasing the radius slightly. Tweak and tune these three setting until you get the detail and definition you desire, then apply masking to limit the sharpening only to the parts of the image that you actually desire to enhance.
Keep your thumb on the option key, and check the previews frequently. Sometimes you will see you are taking it too far in black and white, but you would not notice it in color. I assure you it will be noticeable when printed. Also, if you ever take it too far and want a fresh start, hold down Option, and look where you would normally see the word “Sharpening” in the detail tab. It now says “Reset Sharpening”, click it and you will reset all your sliders.
Here is my before and after image from the process of working up this tutorial:

At the reduced size it is hard to notice, but look closely at the lines in the uniform and at the sunglasses. Both images are identical except for their sharpening settings. Unsharpened is on top and sharpened on the bottom.
Quite a difference is made, with more control than you would be afforded with Unsharp Mask in Photoshop and better tools to help you understand what is going on than any plug-in I have ever used.
Sharpen To Your Own Taste
There are many ways to work sharpening into you Lightroom workflow. Personally, I utilize a two-pass sharpening method. Since I shoot all my images in RAW format, I will apply a pre-sharpening to every image I work with. I give just enough to tighten up to softness that often occurs in unprocessed images. Usually this is a Strength of 60; Radius of .7; Detail of 25 and no Masking.
Then I process my image as I normally would. Once the image is processed I will reevaluate my sharpening and really get it there and use the tools creatively. Alternately, I will pre-sharpen, edit and then use Export sharpening, especially if they are just snapshots destined for a lowly 4 by 6 print.
Hopefully this helps to open your eyes to the power of Lightroom when it comes to sharpening your images. If you have been hopping into Lightroom for your final sharpening, take some time and give this process a chance. You may come to agree with me that the tools offered in Lightroom are more intuitive, and dare I say, more powerful than Photoshop’s native tools and most any plug-in.
Next, let’s move to Part 2 as we discuss Output Sharpening.
