In this, the third and last installment of our series on long-exposure photography, we are going to look into three advances uses of the technique. In Part 2 we examined how to do a basic long-exposure shot of still water. This part assumes that you are a little better equipped (with tripod and filters) and eager to do some more experimental shots.
Shooting Running Water
When shooting still water, my motto is “the longer the better”. There are limits of course to how long you can expose and I’ve never gone beyond 3 minutes although I have seen really interesting pictures with exposures even longer than that.
The longer you expose, the less of the motion you will be capturing.
With running water though, you need to base your choice for exposure time on esthetics and taste. The reason is that by definition there’s motion in running water, and capturing that motion should be part of the story.
The longer you expose, the less of the motion you will be capturing. Some photographers love that completely surreal “water blob” look, I must confess that I’m not a big fan. Just to illustrate the point, here are two unprocessed shots of the Hérisson torrent in the French Jura Mountains. Same location, one with an exposure time of 0.3s, and one with an exposure time of 30s (all other settings are identical; the difference is two stacked ND64 filters on the longer shot.)

The Short Hérisson (Canon 7D, 32mm, f/11, 0.3s, ISO 100)
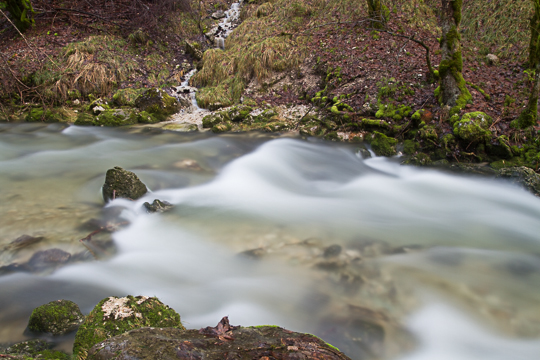
The Long Hérisson (Canon 7D, 32mm, f/11, 30s, ISO 100, 2xND64 filters)
As you can see in the 30s shot all the motion is gone, it’s a very surreal looking blob of water. I’m going to assume that like me you prefer having some motion in the water. That means finding exposure times between 1/10s and 1s most likely, depending on how fast the water flows.
As with the type of shots we explored in Part 2, composition is key. I’ll let you read the composition recommendations I highlighted last month, but let me add a few:
- Try to get as close to the level of the water as you can: this will maximize the visual impact of the ‘slow-motion’ effect.
- Try to capture some of the continuity of the torrent or river: shooting from one bank to the opposite bank rarely works unless you have some really cool landmark on the other side. The viewer wants to see where the water is coming from or where it’s going.
- Don’t focus on a rock or detail mid-stream unless you’re specifically going for an abstract shot. Otherwise the combination of the lack of a recognizable location and the weird water effect will push the abstract level way up.
You will be constrained by where you can put your tripod. You will get your feet muddy, most likely, maybe even wet, but such is the price of a good running water picture. Remember to secure your tripod as well, especially if you set one of its feet in the water. And be careful: slippery rocks can cause you to stumble or fall and put your equipment or even yourself at risk.
Le Hérisson is the final shot I got from the session the above pictures were taken from. In post processing, you might want to boost clarity a little to give the motion in the water a bit of a kick, but as always with clarity, don’t overdo it.
If the light was good and you got a lot of moss and trees in the shot, you’ll probably want to stick with color and choose a warm color processing that enhances those greens. If the light was bland or all you have is rock, you might want to choose a black & white processing.
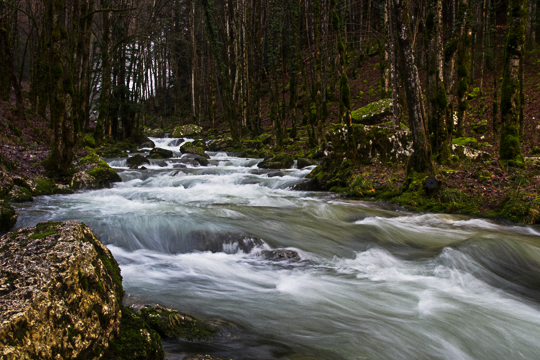
Le Hérisson (Canon 7D, 32mm, f/11, 1/4s, ISO 100)
Processed with Fuji 400H LC Emulation included in XEQUALS Color.
Shooting Light Trails
Light Trails are a classic type of urban shot, but not as easy to pull off as one might think. The concept is simple: when you shoot at dawn, dusk or night using long-exposure, the camera will not pick up moving cars. But it will pick up their front and rear lights in motion, hence light trails.
There are a number of issues when shooting light trails. I’ll try to explain how to deal with them keeping in mind that some you will have to live with.
- The first issue is that in order to get cars in motion, you need to time your shot right. If you press the shutter for a 10s shot just as the lights go red and all the cars stop, you’ve kind of missed your time window. You need to observe the traffic for a few minutes to figure out when the best time may be for your exposure.
- Unless you’re incredibly lucky, you will have some interrupted light trails in your shot as lights from cars that are in the middle of the frame when the exposure stops will be cut out mid-way. This is not an issue if you have so many light trails that they get lost in the midst of it all, but it may be if you have only a few. One way around this is to stack multiple long-exposure shots in Photoshop: if you superimpose multiple photos of the same location with a few light-trails on each, you’ll end up with a lot of light-trails and the interrupted ones won’t show. Remember that the settings for all of these shots need to be identical! Eiffel Interrupted is a typical example of interrupted light trails although to be fair it’s harder to not get them with boats!
- The third issue is that you can only get the light trail effect at night or in low light (dawn or dusk), not to mention that except in the Netherlands people rarely drive with their lights on during the day. Shooting in those conditions means you will pick up a lot of noise, because noise loves darkness. Ideally you’ll want to shoot at dusk rather than night unless the spot you choose to shoot is really well lit. At dusk you’ll have the carlights on, enough darkness that the contrast is nice but not so much that the noise will be unbearable.
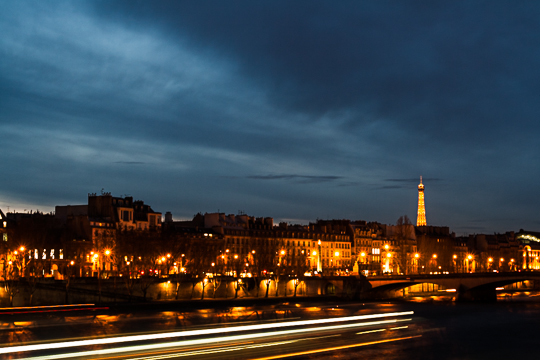
Eiffel Interrupted (Canon 1000D, 64mm; f/11, 15s, ISO 100)
As always, composition is key. You either want your light trails to be the main feature of the photo, in which case there needs to be something interesting about the route the lights take (like a nice curve, or even better a set of curves) or you need some interesting foreground / background. Generally, unless you focus on the light trails predominantly, you’ll want to compose the same way you’d compose without the light trails. Oh, and one last tip: red light looks much more dramatic than white light, so if you can, try to capture the traffic from the back rather than from the front.
I confess to not doing a lot of light trails, so I don’t have a spectacular example to show, but I quite like Stopped at the Red Light because of the lone car.
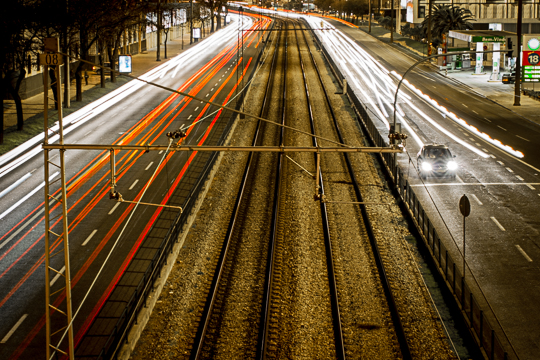
Stopped at the Red Light (Canon 7D, 80mm, f/9, 10s, ISO 100)
Shooting Ghosts
The most advanced of the long-exposure techniques I want to talk about today is shooting Ghosts. Before the days of Photoshop, long-exposure was one of the only ways of shooting ghosts (the other being multiple exposures) and while tricky, the technique has its advantages, one of them being (obviously) that you don’t need any particular post-processing technique to pull it off.
The concept is the following: if you shoot long-exposure, anything that moves fast enough will not be seen by the camera sensor. It will, effectively, be invisible. Look again at the photo of the Brussels Grand Place in Part I: the place was full of people walking around, very few of them show up on the shot.
A direct consequence of that principle is that if a subject is immobile for half the exposure and then quickly moves out of shot, it will show up as transparent on the shot: a ghost.
For this technique you need willing models as it’s unlikely that a passerby will stay perfectly unmoving for half your exposure and then leave quickly. You need to be able to control your model, and they need to be able to sit really still for a few seconds. Here are a few tips to pull if off:
- Ideally you want your exposures to be around 10s. It doesn’t really matter how you get there (low-light, filters or a combination of both). Ten seconds gives the models enough time to settle in the pose they need to stay in, and enough time to leave the scene quickly without being captured by the camera. Less time and there’s a risk that their movement gets picked by the sensor. More time and the risk of them moving and blurring the shot increases.
- Depending on what you want to stage this may not be convenient, but a model sitting or leaning on a wall will be a lot less likely to move.
- Check sharpness of the model’s face (in particular) after each shot by zooming all the way. Reshoot as often as necessary, and remember you’ll have a lot of missed shots. It’s part of the deal.
Once you’ve got the basics of the technique, you can start playing around with multiple models and what they do. The Ghost Hand is a typical example of having different models stay for different periods. The main subject doesn’t move throughout the shot (although the book has moved a bit) and the other model’s hand only stays on shot for about half of the exposure.
This is something you cannot do with multiple exposures and that would be quite hard to do in Photoshop as well.
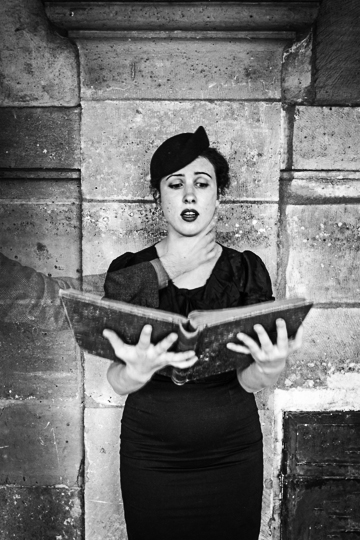
The Ghost Hand (Canon 7D, 32mm, f/5.6, 8s, ISO 100)
Processed with Ilford Pan F 50+ Emulation LC included in XEQUALS Black & White.
And there you have it. This brings us to the end of our three-part series on Long-Exposure. I hope you’ll find the technique as fun and fulfilling as I do. I’m sure there are even more possibilities to it than the ones I’ve outline, but even with those you’ll have a lot to explore and some wonderful pictures to make! Don’t hesitate to get in touch with me below if you have further questions on the topic!


