We all know of the litany of plug-ins available to Lightroom. There are export plug-ins, Metadata plug-ins and external editor plug-ins. All of these tools extend the capabilities of Lightroom, allowing more control over your images and pertinent metadata. Many times they can be time saving tools, other times they are veritable life-savers.
However, there is one application that Lightroom was designed around, one that Lightroom is made to work with. Lightroom is so tied to this product; Lightroom’s official name even bears the weight of the relationship… Adobe Photoshop Lightroom.
Photoshop is quite simply Lightroom’s greatest plug-in. Although in actuality, Lightroom is really a front end for Photoshop, Lightroom is just so good at what it does that often times one can neglect Photoshop in their workflow. But just because it can be neglected, it shouldn’t be forgotten.
The first thing to remember in the Lightroom/Photoshop paradigm is the role of each of the editors. Lightroom is a metadata editor; it non-destructively applies metadata edits to an image that a rendered on export. Lightroom is designed to edit the whole image; local adjustments aside, most edits are applied globally.
Photoshop on the other hand, is a raster editor, altering actual pixels in a destructive manner. All adjustments in Photoshop are pixel edits, actually altering the image. There are non-destructive tools available in Photoshop, but in general it is designed to edit pixels.
Photoshop is quite simply the greatest Lightroom plug-in.
These core differences make each tool incredibly useful in their own unique way. Lightroom lets you rapidly perfect your images, but is limited in its ability to actually retouch an image. Photoshop on the other hand is the definitive tool when it comes to creatively altering images. You can do almost anything with Photoshop, with enough know-how.
Now back to the crux of this discussion. Photoshop, with all of its power, is available for you to use from Lightroom in a variety of ways. While you may have many specialized products tied into Lightroom, none will offer the sheer power and versatility of Photoshop.
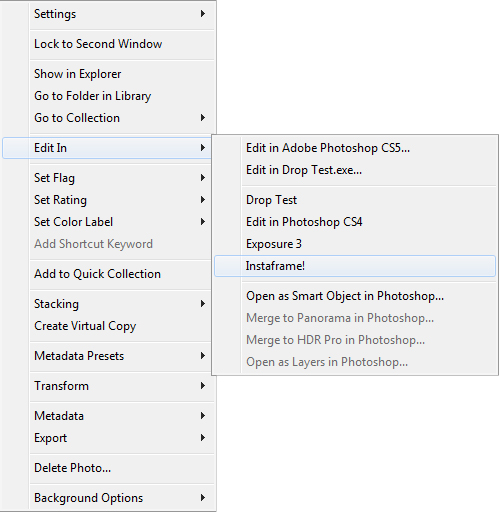
Let us take a quick look at the Edit In contextual menu.
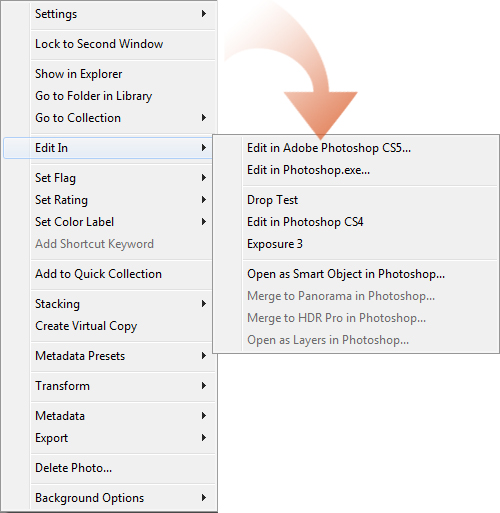
Letting the call out guide your eye, notice the options that are available in this menu for a single, selected image. First is Edit in Adobe Photoshop CS5, which is the basic edit in Photoshop mode. Next, is the Edit in External Editor option, which is labeled on my screen as Edit in Photoshop.exe. This option will change based on what external editor you choose to use. I have it configured for Photoshop CS4.
The section below lists your Edit in External Editor presets. On the sample we have Drop Test, Edit in Photoshop CS4 and Exposure 3. These presets contain custom configurations for the Edit in External Editor feature. By creating these presets, you have all your different external editors ready at a moment’s notice. We will discuss this shortly.
Finally, we have Open as Smart Object in Photoshop. This option allows you to open your image into a Smart Object layer in Photoshop. Smart Objects allow you a non-destructive editing option right from within Photoshop, with a little help from Adobe Camera Raw.
We will look at these options throughout the rest of this article. You will also notice a few unavailable selections as well. Merge to Panorama in Photoshop, Merge to HDR Pro in Photoshop and Open as Layers in Photoshop. These options are out of the scope of this article, but we will cover them here on X-Equals in the near future as well.
For now though, let us proceed.
Edit in Photoshop
The first and most obvious method by which to hop over to Photoshop from Lightroom is to utilize the Edit in Photoshop… option from the contextual menu. This option allows you to bring your current image from Lightroom and open it directly in Photoshop.
Before we move further, I must point out, that this feature is dependent upon Lightroom and Adobe Camera Raw being at the same version. Currently, for Lightroom and Photoshop CS 5, you should have Lightroom at version 3.3 and Adobe Camera Raw at version 6.3.
ACR is always three major revisions larger than the equivalent Lightroom version. The minor revision must be the same for compatibility between Lightroom and Photoshop for the Edit in Photoshop… feature to function correctly. If you do not have ACR updated, Lightroom will show you an error message alerting you to upgrade ACR from Photoshop’s update option.
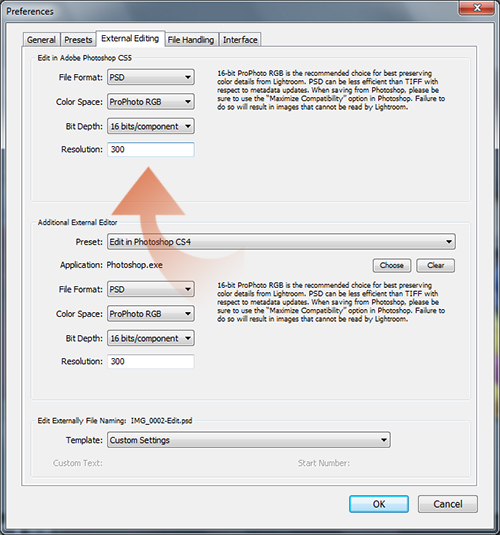
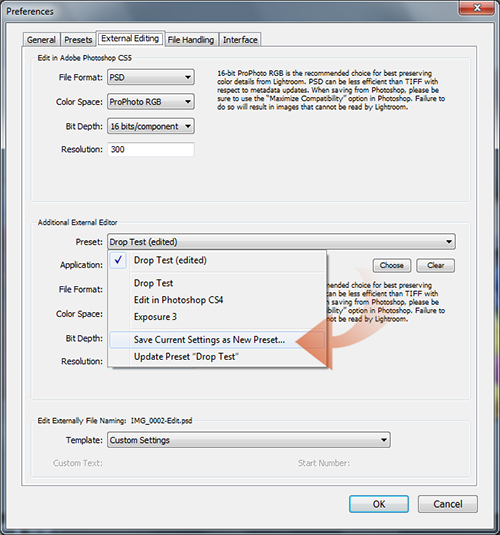
With that out of the way, we next need to be sure that your External Editing Preferences are properly configured for your needs. Press Ctrl/Cmd + , to bring up your Lightroom options menu. From here, select the External Editing Tab.
As indicated by the callout arrow, we want to pay attention to the upper half of the pane for now. I have the settings configured here as I like for transferring images into Photoshop. I prefer File Format to be set to PSD instead of TIFF, as I have ACR configured to open when any TIFF file is opened in Photoshop. When using Lightroom, I find this to be a needless and redundant step. However, be sure to use the Maximize Compatibility option in Photoshop when saving PSD files, Lightroom requires that option to fully read PSD files.
Set Color Space to your preferred expanded Color Space; ProPhoto RGB or Adobe RGB. Bit depth should always be 16 bit, why downsample for Photoshop? Resolution rarely matters, but I set it to 300 for some reason unknown to myself.
Once you have these settings configured, Lightroom will pass on these options every time you use Edit in Photoshop.
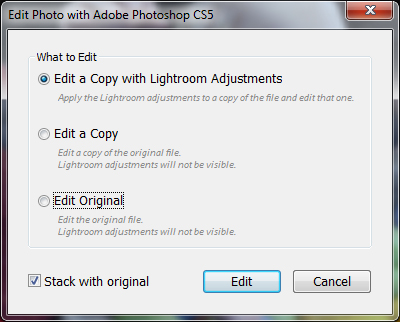
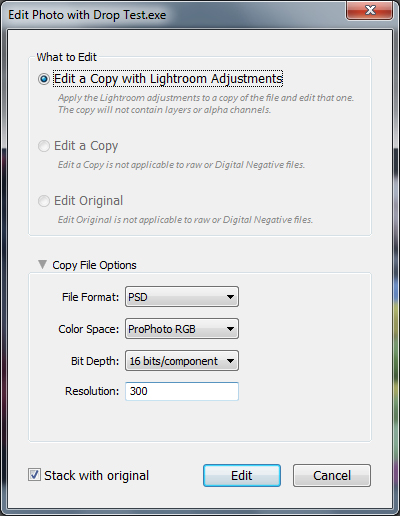
Now, we will go ahead and use the Edit in Photoshop option on one of our images. Once you select Edit in Photoshop from the contextual menu, you will be presented with the following dialog.
This dialog presents you with 3 options by which you can bring your current image into Photoshop. Edit a Copy with Lightroom Adjustments allows you to bring all of your Lightroom adjustments along with your image into Photoshop. The image is not rendered in Lightroom and passed on to Photoshop, instead all the metadata edits are pushed with the RAW data and rendered in Photoshop by ACR. A copy of the image in either TIFF or PSD is created and visible withing your Lightroom filmstrip. If and when you Save in Photoshop, the edits from Photoshop will be sent back upstream to Lightroom.
Edit a Copy simply makes a copy of the original RAW file and passes it along to Photoshop, rendering with no further adjustments. This option is rarely useful, unless you wish to make an iteration of the original file utilizing tools in Photoshop. Edit Original is just what is states, you are manipulating the actual file from Lightroom, directly within Photoshop, with no Lightroom edits.
The Stack with Original option is for Lightroom itself. Any new images created in the process of Edit in Photoshop… will be stacked in the Lightroom filmstrip with the original, source image.
For a Lightroom based workflow, you will almost always use the Edit a Copy with Lightroom Adjustments. If you do not use this option, no Lightroom edits will be transferred to Photoshop. To me, this is the only option worth using, unless you use Lightroom more for the organization purposes and less for the editing capabilities. I guess that works, but then Lightroom is essentially an expensive version of Adobe Bridge.
Once the file is open in Photoshop, carry out whatever edits you desire. If you exit Photoshop or close the image without saving, you will still have a copy in Lightroom, but it will only have Lightroom adjustments present. If you want your Photoshop edits to be visible in Lightroom, use the Save function. Save will update the copy in Lightroom. Save As will allow you to create a derivative file that will not be in Lightroom unless you add it manually.
Edit in Photoshop is the 10 pound hammer of using Photoshop within Lightroom. It throws you in Photoshop and lets you use your old school image editing skills again, but there are methods to use Photoshop’s power with a bit more finesse.
Photoshop Droplets at Export
Droplets are tools that let you wrap Photoshop actions up into a self executable file. Droplets were originally designed to be used in the operating system explorer or finder, allowing you to drop image files directly onto the Droplet, automating the processing of the files without having to actually dirty your hands with Photoshop. Droplets are great for automation, but aside from using them within Adobe Bridge, they were rather unwieldy.
Lightroom, however offers two unique ways to leverage Droplets in your workflow. The easiest method is to apply droplets as post-processing upon export in Lightroom. For actions that you apply last to an image, such as final sharpening, Droplets at time of export are excellent.
I would go more into this method, but we have already covered this particular facet of droplets at length. Check out Good to the Last Drop – Photoshop Droplets here on the blog for more information on export Droplets.
We will look a bit more in depth at the second method of utilizing Droplets from within Lightroom…
Photoshop Droplets as an External Editor
Utilizing Droplets as an External Editor bring the functionality of droplets more in-line with any other Lightroom Plug-In. You can easily round trip an image into Photoshop and have the copy created by Lightroom updated by the droplet, with all adjustments visible from within Lightroom. Export Droplets are only applied to exported files, and the benefit of the actions are only preset in the output files. External Editor Droplets allow your Photoshop actions to manipulate your images and drop them right back into Lightroom, much like Alien Skin and Noise Ninja Plug-Ins allow for.
If you followed the instruction on creating Droplets from Good to the Last Drop – Photoshop Droplets, you already have a few droplets made for the purpose of use during Export. Since you have already made them, you may as well hook them up into Lightroom as External Editors as well. Just make sure that the action you wrapped into a droplet uses a Save command, and that you configured the Droplet to overwrite the original file if you want it to automatically round trip back into Lightroom.
To set up a Droplet as an External Editor, hit Ctrl/Cmd + , again to bring up the Preference dialog and flip over to the External Editor tab.
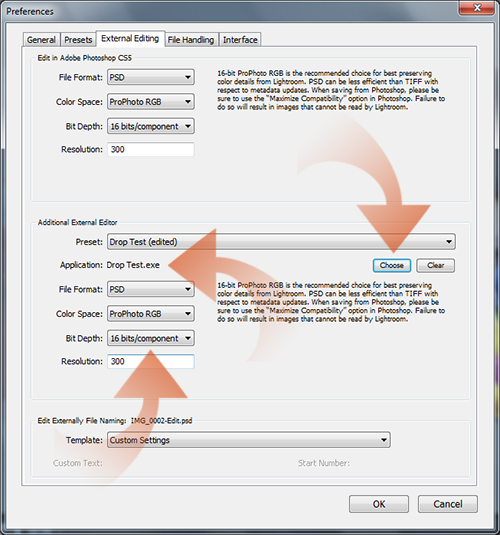
First, click on the Choose button as indicated on the Additional External Editor section of the dialog. Browse to the folder in which you have saved your Droplets. If you have set up your Droplets for Export Droplet use, the Droplets should be stored in the Export Actions folder in your Lightroom folder, where all your preset folders are located. Browse to the droplet you wish to configure and select it.
The Droplet you chose should have its file name appear by the Application header in the dialog. Now, be sure to set up your File Format, Color Space, Bit Depth and Resolution to fit your workflow needs. Do not click OK yet, we need to make a preset first.
Click the Preset dropbox that is at the top of the Addition External Editor options.
Select the Save Current Settings as New Preset… option.
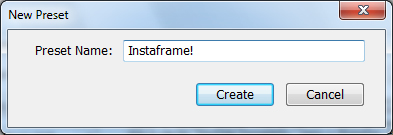
Give it a name you will recognize. Click Create. Then click OK in the External Editing tab of the Preferences dialog. With that click of OK you have configured the droplet to be used as an External Editor from within Lightroom, without having to invoke and Export to apply the effect.
To use your new bit of handy work, bring up the contextual menu and select Edit In…
As you can see, our new Droplet External Editor is now preset in the External Editor preset section. Just click this option and Lightroom will present you with the following dialog.
As you can see, your options here are limited, you pretty much have to choose Edit a Copy with Lightroom Adjustments. You can change your File Options, if you so desire, but they should be set to your defaults. Click on Edit and Lightroom makes a copy and shoots it off to Photoshop which auto-magically processes your image with the Photoshop Actions you wrapped up into the Droplet. Be aware, if any steps of the Action require user intervention, you will have to man the keyboard to make those vital decisions, but aside from that, Photoshop does all the heavy lifting, and if your Droplet was properly created, it will drop your output right back into Lightroom.
Edit as Smart Object
Our final stop is Edit as Smart Object in Photoshop… which allows you to open the actual RAW file, with Lightroom adjustments in a layer in Photoshop with all RAW information intact. Smart Objects are tools offered in Photoshop that allow you to edit layers in their native application, be it Adobe Illustrator or Adobe Camera Raw. Once you open your image as a Smart Object, you need only to double click on the layer in the layer panel of Photoshop and it will fire up Adobe Camera Raw to allow you to refine your RAW adjustments.
Smart Objects does not allow the layer to be reopened in Lightroom, but instead utilizes ACR, which has all of the image processing capabilities of Lightroom in a much less intuitive environment. However, you can make lossless adjustments to the Smart Object layer at whim, while at the same time allowing Smart Object compatible filters to operate and allows you to blend layers via masking and transparency. Certain Photoshop tools, filters and plug-ins are not available to you when editing a Smart Object, but you will find it is still very versatile.
I could go on, but we already have before. To learn about Smart Objects in depth check out the Keeping it Raw in Photoshop series we did a while back. It covers all the major points, pains and advantages of the Smart Object workflow.
So, as you can see, there are a multitude of ways to integrate Photoshop into your Lightroom workflow. Each method has its own strengths and weaknesses, but as you use each one, you will get a better understanding of how you can leverage Photoshop into your Lightroom workflow.
Photoshop has so many capabilities and options that it is almost beyond comprehension. Actions, Scripts, Filters, Plug-Ins; These are all at your disposal with a few clicks. By leveraging Droplets, you can even pack up these tools into handy one click fixes. By combining the ease of use and finesse of Lightroom with the raw power and options available in Photoshop, these two applications offer you everything you could ever need to master your images and you can do it all in one cohesive environment.
