Welcome to Part 4 of Importing and Backing Up Images in Lightroom!
So far in this series we have looked at the process required to organize your images (Part 1), captioning and filtering your images (Part 2), and using the Develop Module in Lightroom (Part 3) to create a simple and easy to navigate Lightroom catalog.
In this last installment we will be looking at two main areas; Creating develop presets to speed up your editing and exporting your images from the Lightroom catalog.
Creating presets has two real benefits for my work; batch pre-processing of raw images and saving finishing adjustments such as monochrome conversion settings.
Creating develop presets, as we saw in the last tutorial, when combined with the editing functions of the develop module in Lightroom are incredibly powerful.
However, the downside to having so much control at your fingertips is that individually editing individual images can be extremely time consuming, especially when you may have hundreds or thousands of images to sift through. Utilization of develop presets can help to stream line your editing workflow and save your countless numbers of hours. Creating presets has two real benefits for my work; batch pre-processing of raw images and saving finishing adjustments such as monochrome conversion settings.
The process of creating both of these is equally simple and the method is identical.
1) Edit your image to personal preference for creating the preset
2) Locate the right hand Presets panel in the develop module
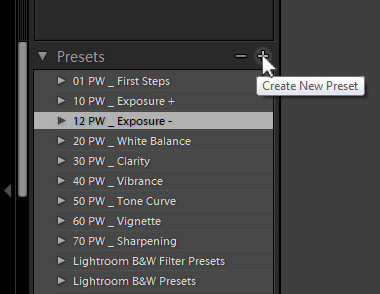
3) Left click on the [+] in the top right corner to open the New Develop Preset dialog box
4) Give the preset a unique and identifiable name (This is what will appear in the preset list)
5) Select a relevant folder to place the preset in, or alternatively create a new folder to place the presets into.
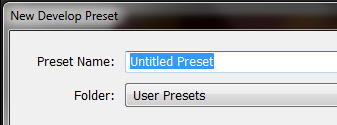
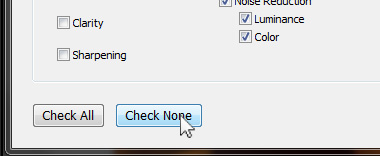
6) Left click Check None at the bottom of the dialog box. This is essential as even if you have not changed the parameter by checking the box you will reset the value on the image you apply the preset to.
7) Work through the list of parameters that you want to automate by checking the box next to them; you need to ensure that any individual image options such as lens corrections are set to automatic to allow Lightroom to add them on an image by image basis. This is essential if you have used multiple lenses as you would not want an UWA distortion correction on a telephoto lens.
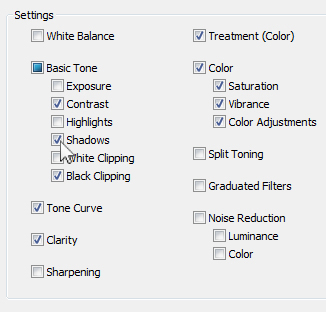
8) Once you have finish, left click Create to save your preset. It should now appear in the right preset panel of the develop module. It is often worth checking the preset has been created correctly on a few images before applying to all your images.

Sometimes you will create a preset and realize that you have set one parameter too strongly or you have forgot to select auto lens corrections. The process of altering the preset is fairly straightforward.
9) Alter the specific parameter to your desired amount on the reference image you used to create the preset originally (make sure all over settings are the same as before). 2) Locate the preset you just created and right click Update With Current Settings
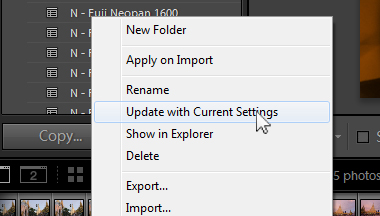
10) Check that all your settings are correct and then left click Update

As you can see above, the process of creating develop presets is remarkably easy. The time you will save every time your process will easily out weight the short amount of time it takes for you to create a personalized set of presets. Once you have finished editing all your images the next step is to export them, whether that is to print, for website use or to upload to social media outputs. Exporting Images By now if you have been following this series you should have a well-organized and efficient approach to using Adobe Lightroom.
However there is really no need for this is your images never see the light of day at the end of it. The final step in the Lightroom workflow is exporting your images. Due to the fact that Lightroom is effectively a highly structured database, exporting images is extremely simple if you have spent the time preparing the earlier steps such as metadata and key wording.
Remember: Prior preparation and planning prevents poor performance. As with most processes in Lightroom it is fairly simple to set-up fast and effective preset to automate the process. Personally I have preset for the various upload locations I have such as Facebook, my website and Google+, presets for printing and finally a small jpeg preset for email attachments.
Exporting Images
To export images from Lightroom you need to select the desired images and then either left click [Export] in the bottom left of the Library module or press Ctrl+Shift+E if you are using a windows PC. This will then bring up the Export File dialog window.

1) The first step of your export workflow is to choose from one of the Export to presets that are installed. Lightroom now has functionality to allow direct upload to services like Flickr etc. For this tutorial however we will go with the default Hard Drive option.

2) The second step is to select the export location. You can choose from a few default options such as Desktop and My Documents or you can choose any folder you wish. If you are creating presets it’s good to select Choose a folder as Lightroom will then prompt you to select a folder when the preset is run.
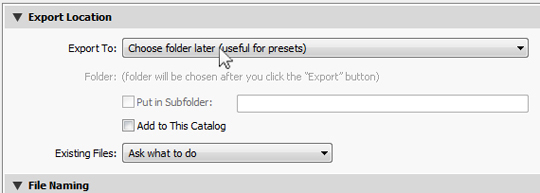
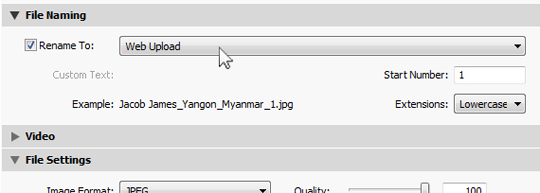
3) You will then need to decide on a renaming structure. Some people may choose to keep the naming structure they have used in the Lightroom catalog.
I have recently started using a simple naming convention for my web images: {Creator}_City_{Country}_[Sequence # (1)}
This will produce file names such as Jacob James_Siem Reap_Cambodia_1.jpg which will hopefully be more search engine friendly and bring traffic to my website.
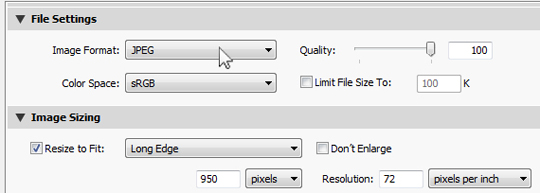
4) The next step is to decide on the file format and quality you wish to export the images in. The first step is to decide on the file type which for web use, printing or email will be JPEG.
For further editing you may decide to export a TIFF file. It is also important to consider the color space in which you wish to export your images, for any application where the image will be viewed on screen then it is best to export in SRGB format however images that are exported for further editing are better off being exported in Adobe RGB or ProPhoto as these have much wider color gamuts (color value ranges).
5) On export, Lightroom will also allow you to add some preset sharpening. This is useful especially if you are reducing the images in size. I tend to leave it set to Screen and Standard, however you can also set it to Matte Paper or Glossy Paper.
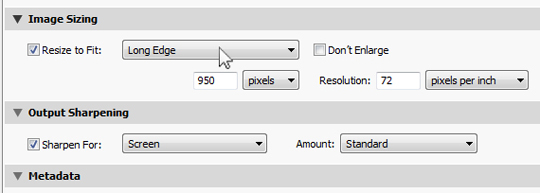
6) Metadata is an important aspect of the Lightroom catalog and the next step is to decide what you wish to keep on export. You have the options of stripping it all out, removing everything but the camera information, keeping only copyright and contact information or retaining it all. Generally I leave it set to All unless file size is hugely restricted then I may remove partial parts by setting it to Copyright and Contact only.

7) One of Lightroom’s advantages over other software is the amount of customization in the watermarking options. Personally I rarely watermark images unless it is for images I give away at large sizes on my blog. Within the watermarking options you have the ability to choose text or graphics for your watermark, choose the scaling and position of the watermark and also create watermark presets.

8) Finally the very last step of the export window is to decide what you want Lightroom to do next. For all the presets I create, except the email, I choose Do Nothing however for the email preset I ask Lightroom to open up Microsoft Outlook. This then attaches the image to an email for quick and easy sending of your images.

And there you have it!
By now you should hopefully have a good grasp on the process of importing images from your memory card, all the way up to uploading them on to your personal website or image sharing site.
Hopefully throughout these tutorials you have come to appreciate the power of Lightroom lies in it’s ability to create presets and it’s organizational structure.
Utilizing Lightroom for what is does best can save you many hours of your time and give you more time to spend on what’s important … taking images.


