Should I shoot RAW or should I shoot JPEG? That is the eternal question digital photographers struggle with day after day. Take a look at any photography message board or Flickr group and you will likely find a heated discussion weighing both sides of this bit depth issue.
Proponents of each file type have strong arguments in their favor, but there are some major technical differences between RAW and JPEG that can help you make a decision for yourself.
Bit Depth Is The Biggest Difference Between JPEG & RAW
JPEG is standardized as an 8-bit image file. This means that each color channel of a pixel has 8-bits of data allocated to reproduce color.
Sometimes you will find 8-bit color referred to as 24-bit color, which simply combines the bit depth of the Red, Green and Blue channels (8 bits + 8 bits +8 bits = 24 bits). Photoshop and Lightroom use the single channel nomenclature, meaning an 8-bit file can address 8 bits of data per color channel per pixel.
An 8-bit file can address up to 256 levels of luminosity per color channel. In Photoshop, this appears as a numeric value ranging from 0 to 255. 0 is the lowest luminance level, while 255 is the highest. A color with all 3 color channels registering 0 is black whilst one with all 3 channels registering as 255 is white.
By multiplying the three channels together we can get the total color depth available in an 8-bit file (256 x 256 x 256 = 2563 = 16,777,216). An 8-bit file is capable of representing up to 16.7 million colors at any given pixel.
That number seems massive, but it simply is not as big as you might wish it to be if you plan on manipulating your image much.
On the other hand, a RAW file is output at the native bit depth of a DSLR’s image processing chip. Common bit depths are 12, 14 and 16 bits output from the sensor into the RAW file. Let’s consider a 12-bit RAW file, which is common on many existing entry level DSLR’s. A 12-bit file can address up to 4,096 levels of luminance per color channel as opposed to 256 levels possible in an 8-bit file.
Multiplying across the RGB spectrum allows for 16,777,216 colors, creating the possibility for 68,719,476,736 different colors for any given pixel. 68.7 billion colors possible versus 16.7 million, that is over four thousand times the amount of possible colors.
‘Seeing’ Vs. Editing
At this point the exercise is simply mathematical and theoretical. Since the human eye can only distinguish between 7 and 10 million colors, an 8-bit file is all we really need, right? Well for output that is more or less an accurate statement, but for editing and processing purposes we are cutting awful close to the limit.
In Photoshop, limiting the bit depth to 8-bits can cause color banding in gradients, also known as posterization.
The more processes and filters applied to the image magnifies the chances of color integrity degradation.
By working with an image as a 16-bit file you can eliminate the color degradation in the image, as Photoshop can address more than 16.7 million colors, allowing for better control of the color data. A real-world example is an image processed through multiple filter passes using AlienSkin Exposure 2 and Nik Color Efex Pro 3.
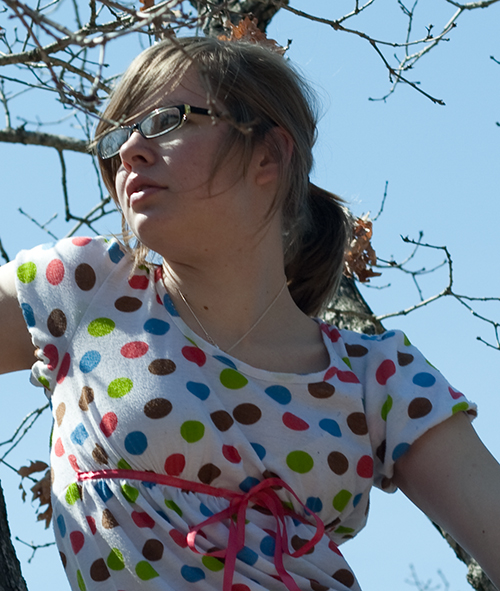
I started out with this image right from Lightroom.
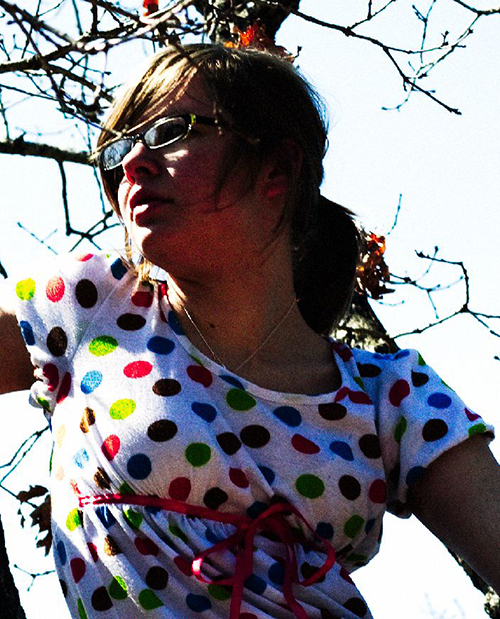
I edited this photo in Photosop CS4 from Lightroom twice. This first iteration remained a 16-bit file, created from my 12-bit RAW file. The second iteration was downsampled to 8-bit upon arrival in Photoshop. Both files were subject to 4 conversions in Exposure 2 and 4 conversions in Color Efex Pro 3.
Each filter was applied to both samples with the same filter settings. After the 8 filter passes, the color degradation could be seen.
The above image was the file that remained 16-bit through the filtering process. The added grain from the film filters is noticeable, but colors transition well. Also note the color dots on the shirt in the bright region on the left side of the image.
The above image was the file initially converted to 8-bit in Photoshop before processing. Compared to the prior sample the grain is even more noticeable, even though the same filters were used. This is due to the last of smooth graduations from the color of the grain to the color of the photo. When looking at the colored dots in the bright region on the left side of the frame, notice how the yellow and orange dot visible in the top image are drastically faded out and that the other dots in the area are less “smooth” than they were in the prior image.
Now, since some crazy filters were applied, many of which adding in grain both images are drastically altered from the original and appear similar. However you can notice a definitive color shift between the two images and the 8-bit image became quite noisy with some loss of detail. The 16-bit file held up to the stresses of the test much better than the 8-bit file, even with a final conversion to 8-bit to save the image to JPEG for the web.
Starting out with more bits of color data helps the process immensely, and remaining in an expanded bit depth during processing allows Photoshop much more room to manipulate colors. Although the human eye can only perceive a limited range of colors and 8-bit files offer 16.7 million colors, the effects of multiple editing passes show up more in the file rendered and processed in 8-bits than in the one rendered in 16-bits and processed before a final downsample to 8-bits.
Even when you downsample at the end to 8-bit, you are then limiting the image to 16.7 million colors. But you are putting off Photoshop having to make hard color decisions to the very end. Photoshop can make its best guesses for downsampling from a wide range of colors, allowing for a smooth downsampling.
However, if you work the file in 8-bits the whole time, Photoshop has to make its color guesses on every pass, leading to more color errors and artifacts.
How Does This Apply To Lightroom?
So far we have only really considered working in 8 or 16-bits in Photoshop, but when working in Lightroom it is even more important. Lightroom excels at manipulating RAW data, enabling it to perform impressive edits on a 12-bit RAW file that aren’t possible with a 16-bit file in Photoshop. But even when editing a 16-bit TIFF in Lightroom, such as a film scan, a 16-bit file allows Lightroom to operate on the image much more smoothly than on an 8-bit file.
Have you ever tried to edit a JPEG in Lightroom? It is not a fun endeavor, as you will quickly discover the sliders are not as responsive as they are on a RAW file, or even as responsive as working on a 16-bit TIFF. This is due to the limited color range of the 8-bit image. Anything more than a few quick fixes to a JPEG in Lightroom results in a mangled image.
Lightroom is for RAW file processing. If you use Lightroom, shoot RAW. You will get so much more out of the software. Even if you are working with raster images, such as scans, give Lightroom the most data possible to further manipulate your image, give it 16-bit files.
A 16-bit file will contain all the color information most any scanner on the market can produce, and if you have to convert a RAW file to a raster image for editing for some reason, a 16-bit TIFF will retain all the color data possible from a 12 or 14-bit RAW file as can be managed.
Another point to consider, outside of bit depth but still pertaining to it, is in-camera processing. When you shoot JPEG, you are entrusting your camera to make the best decisions as to the color and tone of your images. Usually it does a pretty decent job, and many people compare the JPEG experience to shooting Slide Film.
The problem is, the camera is throwing away massive amounts of image information while processing the JPEG. As we discussed, a 12-bit image carries significantly more data than an 8-bit image. That data cannot be recovered, but it is data Lightroom and Photoshop can use to help you create the image you desire.
Lightroom is specifically designed for RAW file processing. If you use Lightroom, shoot in RAW.
JPEG is not like shooting film at all. In the film world you can make prints or scan the film to get what you need from it. There is a lot more color data in that negative or slide than there can be rendered by a scanner or even a DSLR sensor. Simply put, you can manipulate a negative or slide more before final output than you can a JPEG. A JPEG is really much more like a Polaroid. You can do a bit to it, but not much before quality starts to suffer.
Why We Do What WeDo
Hopefully, this lays out another convincing argument for shooting RAW as opposed to JPEG. Sure, JPEG is quicker and saves space, and you may feel that your skills can get the most out of JPEG and you don’t need RAW. But simple math doesn’t lie. 68 billion colors is more than 16 million.
When you consider that a camera sensor or a scanner sensor is simply measuring levels of luminance of Red, Green and Blue in an image and uses that data to recreate a full color image, color bit depth has a massive impact on your images, from color to clarity, sharpness to contrast. Since a camera captures light, it only records color data.
When you really think about how a camera works, be it digital or film, you can see more color data is important to image quality all around, not just for color bit depth.
In the end we are all here to make the best images we can that fulfill our personal vision. Don’t try to save a few megabytes and a few minutes by shooting JPEG. You may find that the JPEG you shot needs further editing, and if you shot it in RAW you would have a much easier time of persuading the image to your will.
Don’t be lazy; take control of your images.
If it was the old days once again, would Polaroids be enough to satisfy your clients? JPEG is the digital equivalent of a Polaroid, not slide film; what you shoot is what you get. The real money back in the day was shooting slide and negative film, something that you could work with in the darkroom. RAW is the same thing, just for the Lightroom.


