Welcome to Part 3 of Importing and Backing Up Images in Lightroom!
So far in this series we have looked at the process required to organize (Part 1) and captioning and filtering your images (Part 2) to create a simple and easy to navigate Lightroom catalog.
In this tutorial, Part 3 of the series, we are going to be taking a look at using the Develop Module in Lightroom and the effect that each tool will have on your images.
The Develop Module can be separated into three main sections: Raw Adjustments, Global Adjustments and Localized Adjustments.
The first point I must stress however is that image processing and editing is just one step in the creative process. Don’t ever be fooled into thinking that you can rely on your editing skills to produce great images.
Great images are a combination of exposure, light, composition and capturing that special moment in time. Editing and processing should be seen as a refinement step and never as a rescue step.
Develop Module

The develop module is the editing center of Lightroom. It is accessed by selecting Develop from the menu panel or using the shortcut [D]. The Develop Module can be separated into three main sections: Raw Adjustments, Global Adjustments and Localized Adjustments.
Post-processing is your opportunity to put your stamp on the images you have spent time creating.
Separating them into these three categories makes it easy to work through and should hopefully give you consistent results. I have found that it is easy to spend hours upon hours of your time in the develop module if you do not create a consistent and easy to use processing workflow.
Raw Adjustments
Generally this should be the first step of any workflow when you are working with raw files. It is essentially a preparatory step and can be applied in bulk to many images in one go. RAW files by definition should be flat and lifeless compared to JPEG files when they come straight from the camera.
This is because cameras apply processing presets to JPEG images and not to RAW files. This should allow you greater control over your image processing rather than relying on what the camera thinks is best.
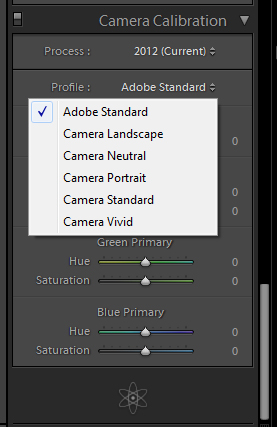
The first step to your RAW workflow is selecting a raw conversion profile. By default you have the ‘Adobe Standard’, however if you click the drop down box you will have a selection dependent upon your file. I have the option of ‘Camera Faithful’, ‘Camera Landscape’, ‘Camera Neutral’, ‘Camera Portrait’ and finally ‘Camera Standard’. I find the best results come from selecting ‘Adobe Standard’, ‘Camera Standard’ or ‘Camera Neutral’.
The landscape/portrait/vivid profiles can have too much contrast and saturation. I prefer to control these parameters individually later on in the workflow.
The only problem I have found when using ‘Adobe Standard’ is that it can often render reds too saturated and sometimes you can lose detail in parts of the images with high red values such as lips, monk’s robes, lanterns etc.
If you use a calibration device such as a colorchecker you can easily create calibrated profiles for your camera so that all your results are reproducible. This is ideal for situations where color accuracy is essential and it helps to remove all the guess work to ensure your colors are spot on.
Editing and processing should be seen as a refinement step and never as a rescue step.
The second step to RAW adjustments is Lens corrections. Lightroom has the ability to correct for both distortion and vignetting. You can set Lightroom to automatically correct this but I find that sometimes distortion can be used to enhance the image.
This is the reason many travel and documentary photographers use wide angle lenses to exaggerate and to add emphasis. I find that correcting vignetting at this stage is a futile exercise as I tend to add a small amount later anyway to help draw the eye into the image, so it seems ridiculous to remove it, and then re-add it later.
Also, setting Lightroom to automatically correct Vignetting will degrade the image as it is forced to up the exposure in the corners, which is likely to increase the noise and artifacts in those areas.
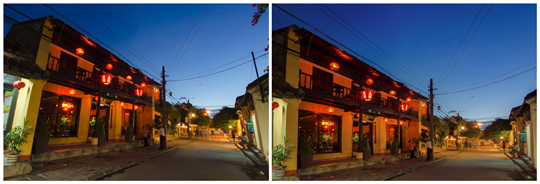
Before & After Perspective Correction
Lightroom also allows you to correct perspective in your images. This can be a problem when using a wide angle lens as unless the lens is perfectly level it can cause a phenomena called converging verticals. See example below
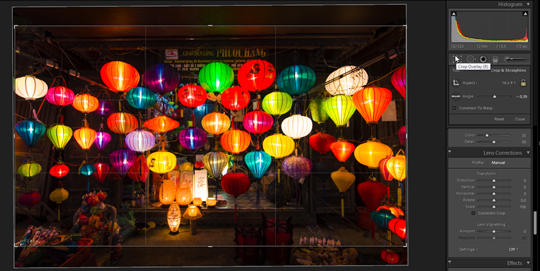
After completing the above steps we then move on to straightening and cropping our images. Cropping allows us to fit the image to whatever aspect ratio we like and straightening is useful for correcting wonky horizons. Cropping can also be used to remove unwanted elements in the image that weren’t apparent at the time of capture.
The final part of the RAW adjustments workflow is adjusting clarity and vibrance. The clarity slider is an extremely powerful tool for adding ‘punch’ to your images. The clarity slider works by increasing or decreasing mid tone contrast.
By increasing clarity you will find that the images look more defined and pop a little more. However, please don’t overdo the clarity slider, it looks terrible!
I very rarely take the clarity slider down into negative values but sometimes it can work on images you wish to smooth a little such as portraits or abstract blurred images.

Vibrance Before & After
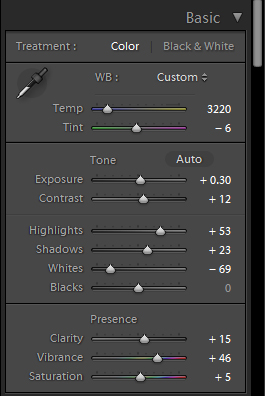
The vibrance slider on the other hand works very similar to the saturation slider. However unlike the saturation slider, which increases saturation across all colors, the vibrance slider only increases saturation in certain colors. This gives a much more realist result and prevents you from getting horrible and unnatural skin tones.
Global Adjustments
Global adjustments are adjustments that affect the image as a whole. They include sliders such as exposure, white balance, noise reduction, sharpening and contrast. Unlike the RAW adjustments these tend to be more image specific adjustments. The first step for me is to adjust the highlights and shadows to get the histogram covering the entire color range without clipping or blowing any colors.
I then adjust the white balance to ensure that my colors as correct. This can be done using a reference point in the image that you know is neutral or it can be done by eye. Normally you may want to increase or decrease the white balance values from neutral so that the image appears more realistic and pleasing to the eye. Portraits often work best slightly warmer than neutral.
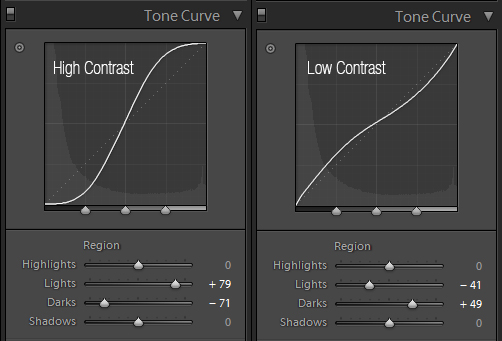
The next step in global adjustments is contrast. Contrast can be controlled in two ways; using the contrast slider or by using the tone curve. The advantage of the tone curve is that you can control the contrast range more easily. Below are a few examples of how you can utilize it to add or remove contrast
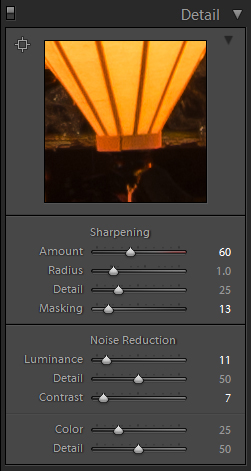
I generally finish off with some small amounts of sharpening and a small amount of noise reduction. The sharpening tool should only be used very subtly and you should never try to use it to use it to compensate for a lack of capture sharpness. The key to using the sharpening tool is utilizing the masking slider. By holding down [ALT] (PC) or [OPTION] (Mac) whilst using the slider you can see where the selective sharpening will be applied.
Using the mask prevents adding unnecessary artifacts in areas of smooth tone such as skies.
Noise reduction is also a tool that should be used in moderation. For me personally I am not averse to leaving some noise in my images if it means maintaining sharpness. However the best results are obtained by getting the right combination of luminance, detail and contrast sliders so that you reduce noise as far as possible before you begin to lose huge amounts of detail.
Local Adjustments
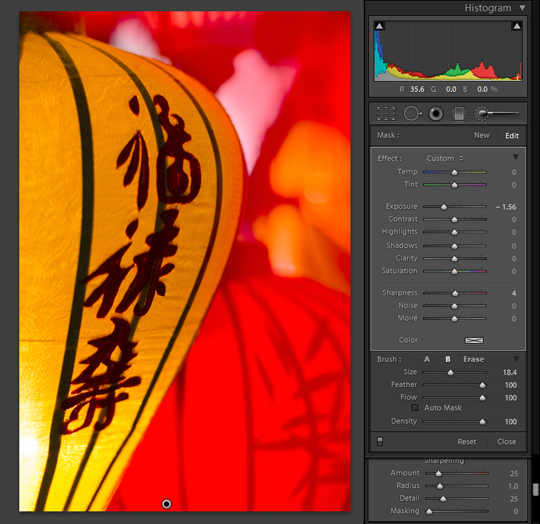
The final step in the processing workflow is making local adjustments. These can be done in 2 main ways; adjustment brushes and gradients. They are designed to add or remove emphasis from various elements of the image. The adjustment brush tool ([K] shortcut) can be used to add local adjustments with many different effects.
Nearly all of the global adjustments can be found as local adjustments allowing you to selectively add contrast, increase the exposure of a subject’s eyes or darken the background of an image to add emphasis for example.
The red mask shows the location of the adjustment brush:
The second way to produce local adjustments is using the graduated filter tool ([M] Shortcut). The tool works very much in the same way as a real graduated filter as it allows you to increase the effect on part of an image and slowly reduce it across the rest of the image. This is ideal for controlling the exposure of skies in landscape images.
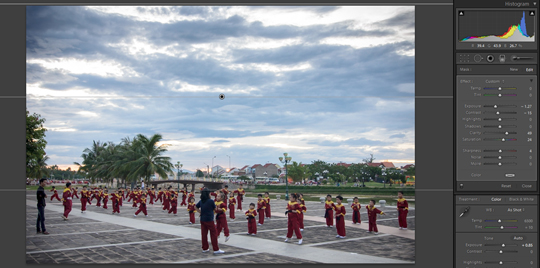
Graduated filter to reduce exposure and increase clarity in the sky
Hopefully by now you should have a basic understanding of how each tool works in relation to your images. As with most parts of photography it is essential that you go away and spend time developing your own style when it comes to using the editing and processing functions.
… image processing and editing is just one step in the creative process.
Post-processing is your opportunity to put your stamp on the images you have spent time creating.
In the final part of the series we will be looking at creating develop presets to allow you to automate corrections over a range of images and then finally we will look at how to export your images from the Lightroom catalog into a web friendly format.


